Hello everyone, I’m REV0, and welcome to the Developer Diary of the Netherlands Region Pack. In this thread, I will talk in detail about the creation and production of the 9th Region Pack that is out now on Paradox Mods [link here]. You will also find hints and extra information regarding the assets of our pack.
Introducing the team
If you are a Cities: Skylines (1) player, or you are an enjoyer of the Region Packs for Cities: Skylines II, you already know them. Feindbold is one of the creators behind Region Pack Germany, and he later contributed to Region Pack China with his high-density buildings. He is also the name behind the ‘Skyscrapers’ and ‘Urban Promenades’ Creator Packs for the Cities franchise.
Gèze and Gruny were co-creators of Region Pack France and later joined the US team to deliver extra assets for both US Region Packs. Gèze is also the creator of the ‘Seaside Resorts’ Creator Pack for Cities: Skylines, and Gruny is the creator who developed the ‘Leisure Venues’ Creator Pack for Cities: Skylines II.
As for myself, I’m a bit of a railway enthusiast, and I have worked on the ‘Bridges and Piers’ Creator Pack with Armesto and developed the ‘Mid-Century Modern’ Creator Pack. I later worked with Gèze, Gruny, and Jerenable to deliver Region Pack France.
With the introductions done, let’s talk about the development of the pack, which many of you have been asking about since the release of the first sets of Region Packs.
Background
The interest and size of the Dutch Cities community is not a secret; it represents a large and very active side of the playerbase, which is passionate about urbanism, transit, and city building. Even during the production of original Region Packs, we as creators had an interest in working on a Netherlands Region Pack and saw the interest the community had in including this region. However, back then, the budget, manpower, and time constraints didn’t allow for the creation of a 9th Region Pack, but following the completion of the original packs and the positive reception of the content, our collective interest in a Netherlands Region Pack was re-ignited, and PDX gave us the green light.
Lessons Learned
As previously mentioned, all creators of the Netherlands pack are veterans of previous packs. Our collective experience on Region Pack development allowed us to quickly set up the basic features and the scope of the new pack.
We assessed that, as players, you wanted maximum versatility from growable buildings. This included consistent design language, a good thematic split between zones, as well as customisation options that make sense. We know that you really liked the Low Rent buildings from the French Pack, and as such, the Netherlands Region Pack comes with its own Low Rent zone, which I will be talking about in detail later. Service buildings are always appreciated, and as such, the Netherlands Region Pack covers all major public service categories.
We know that you prefer to keep props to no more than what is needed. Netherlands Region Pack assets are modestly propped without going too excessive, and we used compact asset sizes, without wasting any unused space.
The Pack also includes a windmill that will stamp ‘Dutch’ into any city build, as well as new props for players who enjoy doing a bit of decorating.
We believe that our selection of growables and service assets will not only serve Dutch-inspired cities but also expand the Dutch architecture influence beyond the borders of the Netherlands, as they’ll fit into any modern city.
Concept
Following the greenlight, we got the budget and the timeline to work on the pack. Given the short timeline, we revised our original pitch to a more realistic concept.
We later created our own standards based on the feedback you have provided since the release of other packs, and started to shape the asset roster of the pack.

We used a moodboard to collect and sort references.
Asset Selection and Organisation
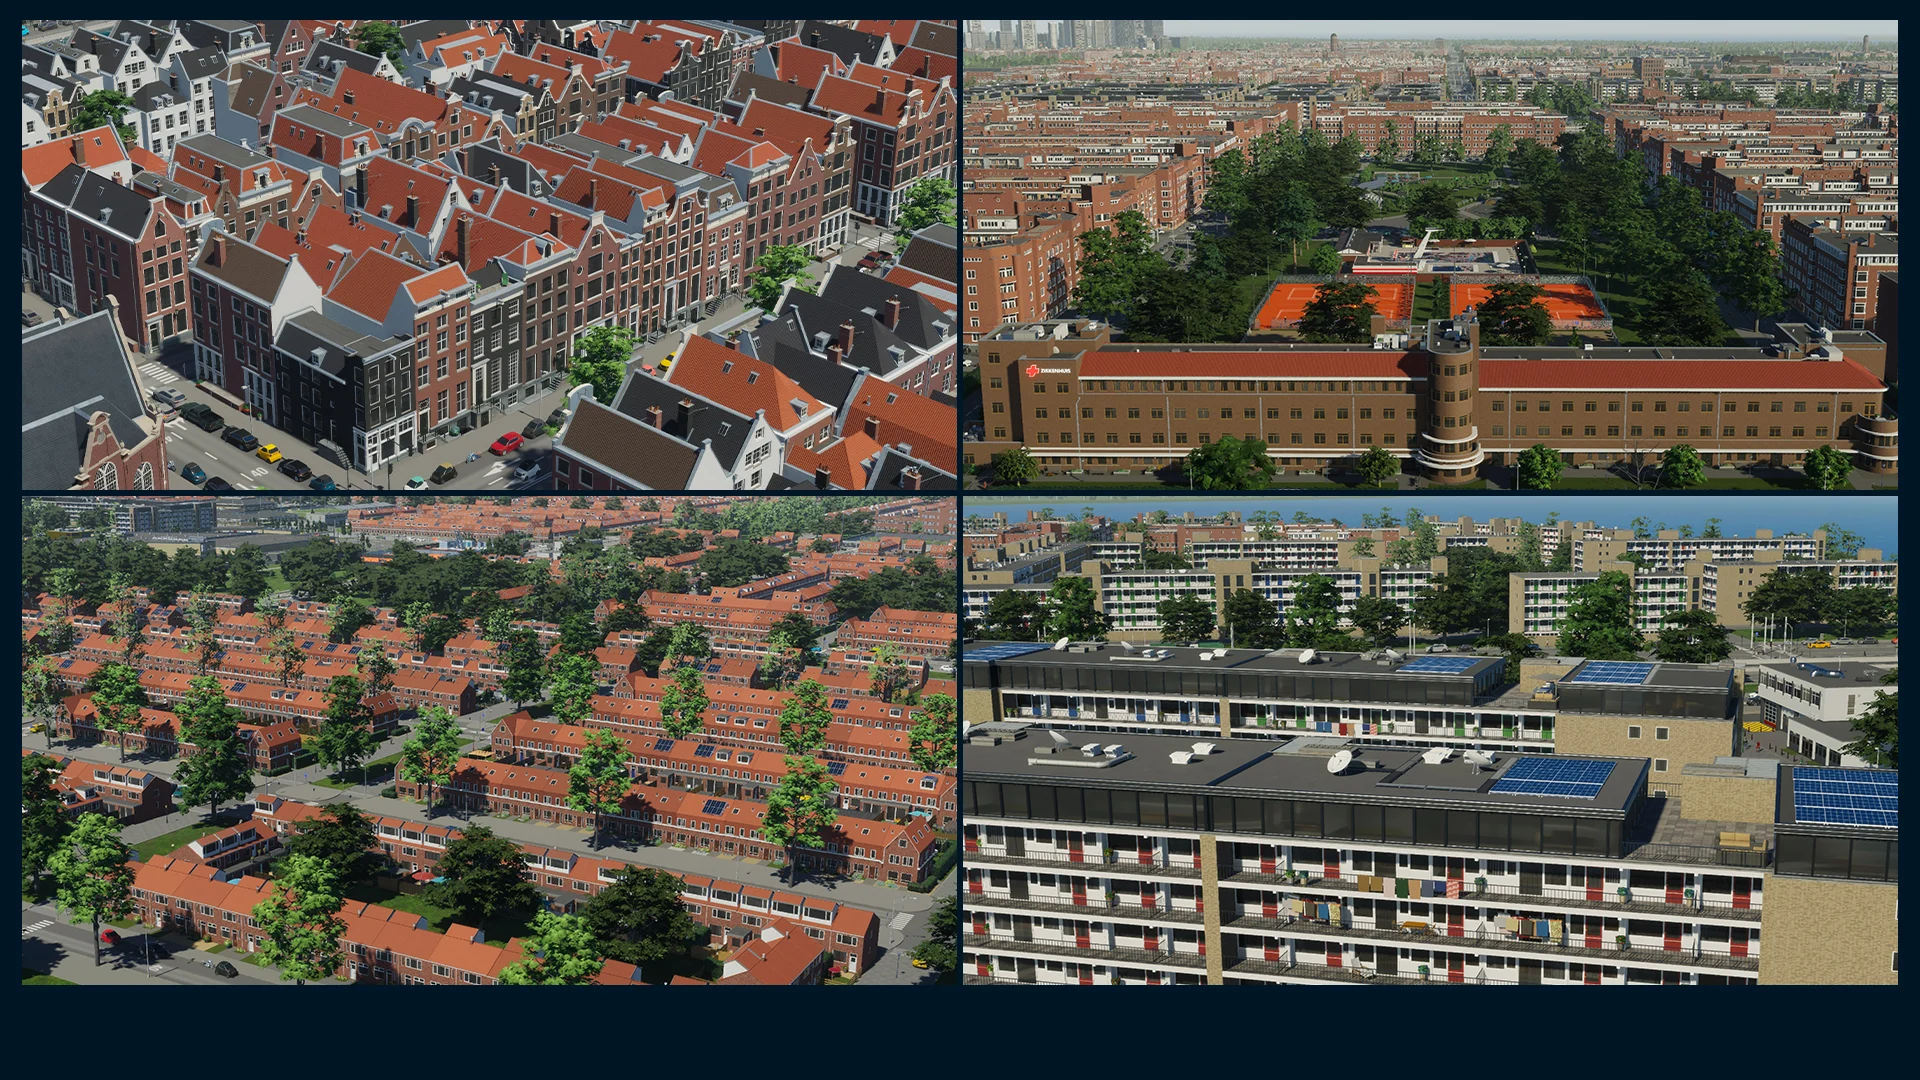
Examples of the different styles included in the Region Pack.
We considered residential areas as the highest priority, since they would represent the identity of the pack. We also wanted to ensure players had enough asset variety to kickstart a Dutch city, regardless of the time period, and to progress naturally through the gameplay. As a result, we decided on the following zones:
Medium Density Row Housing: Inspired by historic towns and city centers
Low Density Residential: Represents the suburban expansion
Medium Density Residential: Represents the modern urban development push starting from the 1920s in the Netherlands
Low Rent High Density Residential: Represents the post-World War II urban redevelopment and housing complexes
Service buildings followed growables, and they were selected based on their visual compatibility with the growables in terms of size and architectural design.

Lastly, we identified potential landmarks - specifically, key landmarks that could be modeled within a reasonable timeframe. Among that selection, the Historic Windmill, Post Office, Train Station, and College building made it to the finish line.

After reviewing the selection we had made, we distributed growables and service buildings among team members.
Technical Features and Decisions
During the concept phase, we also settled on basic features of the Region Pack. Based on your feedback from other packs and our experience, I've created a checklist to guide us through the selection and creation of assets. The list included some of the remarks:
Colormaps
Most of the Netherlands Region Pack assets fully take advantage of the color channels that are provided by Cities: Skylines II. Although the perfect flexibility was not possible due to Cities supporting a maximum of 3 color channels, all pack assets follow a consistent recolor scheme. This scheme is split between building facades, rooftops, and other elements, typically in the same order of arrangement.
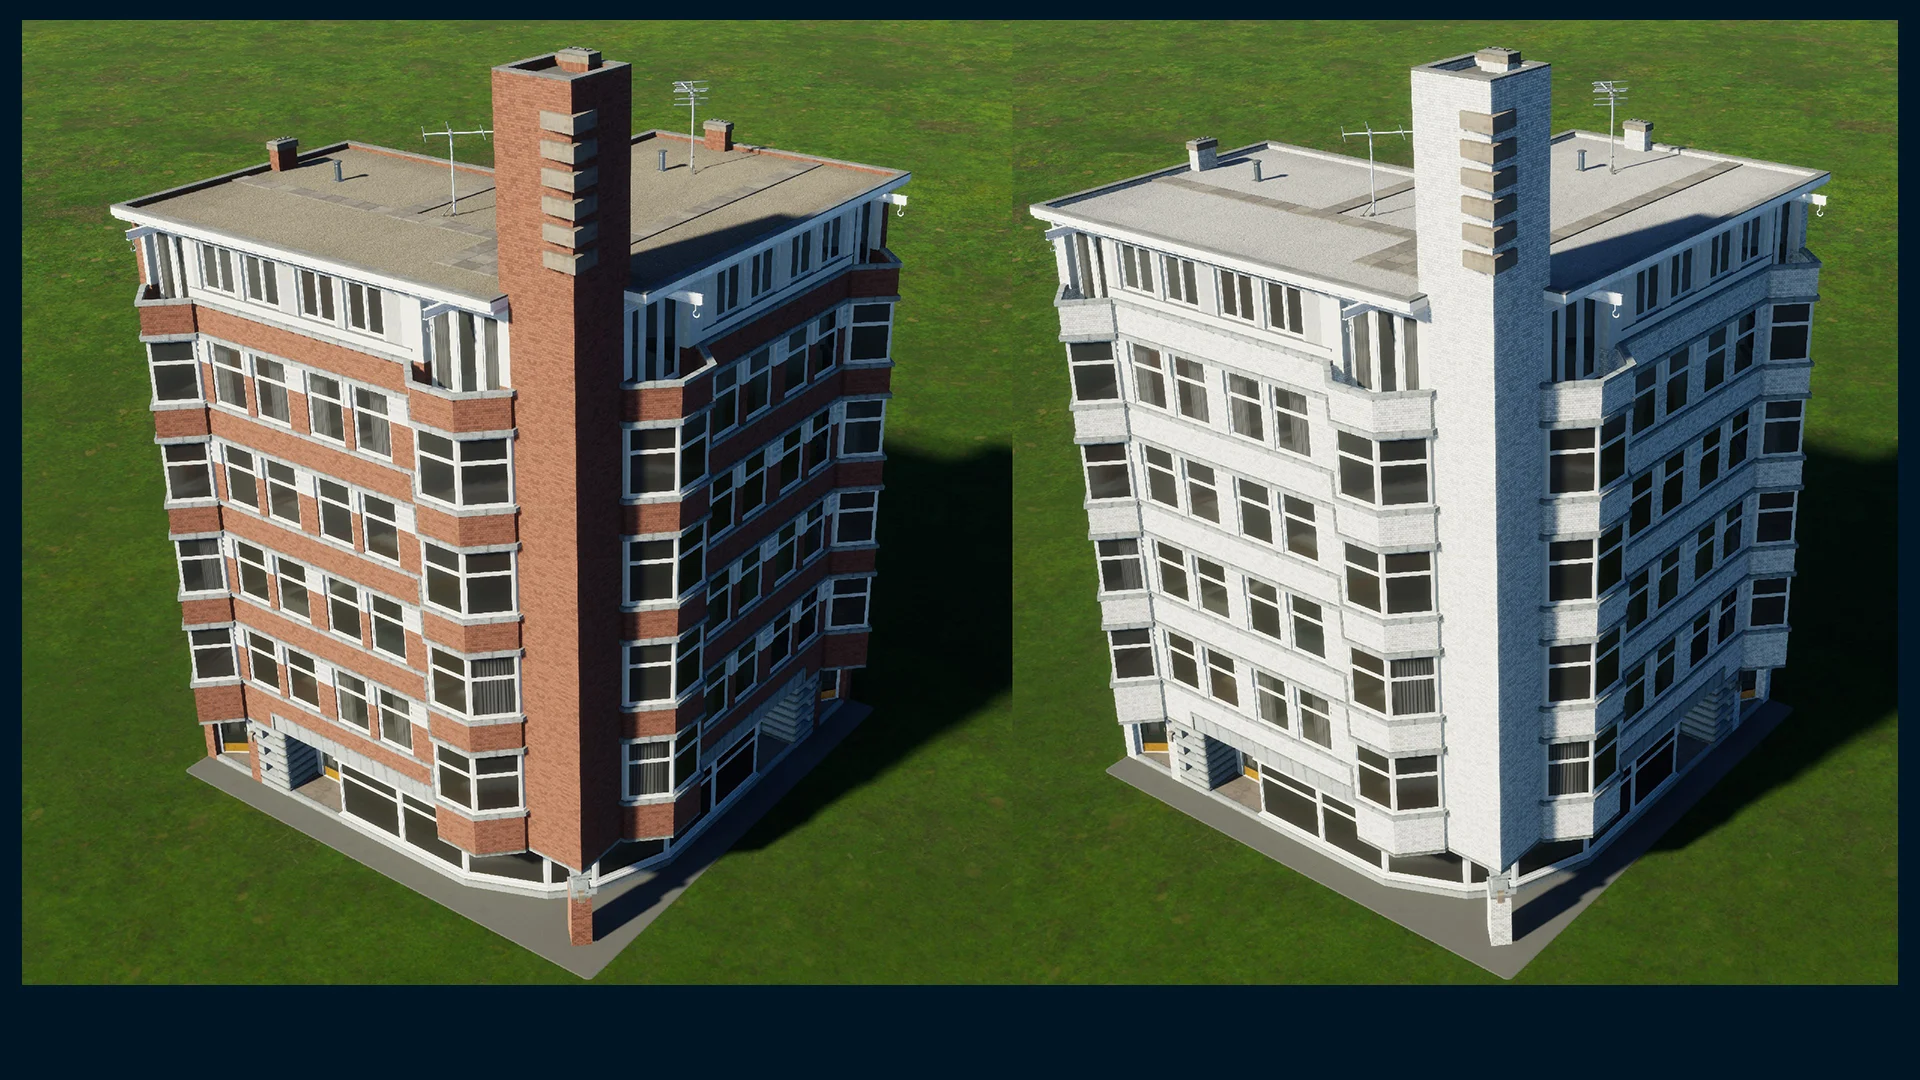
One of the Medium Density buildings with and without color maps.
Zone Depth
We also settled on zone depth, which was important in terms of how the game algorithm handles our growables. 2 and 3 unit depth turned out to be the most practical zone depth, which all Netherlands Region Pack growables (except low rent) adhere to.
Pathfinding and Door Positions
We learned from the French Region Pack that doors that are too close to each other can throw pathfinding errors in the game. To minimize art-related issues, we paid attention to where door markers go in the assets, especially in historical row housing, and designed assets accordingly.
Building Offset - 1m Setback
Another important decision that had to be made in the planning stage was the setback of buildings from the street. We took our learnings from the French and German Region Pack and went with a standardised 1m setback for the Medium Row, Medium, and Low Rent zones.
This setback from the road was for multiple reasons. First, Dutch buildings are unique in a way that most buildings are known to have multiple hooks prominent on the facade. Staircases in these buildings are often very narrow, and these hooks are meant to help lift heavy or bulky furniture into apartments. Additionally, many of the old Amsterdam buildings have small staircases in front of the buildings.
From a technical standpoint, it is good practice to keep the mesh within the boundaries of the lot and leave overhanging parts to a minimum. With that in mind, incorporating unique elements like the hooks and stairs means setting back the facade by a certain amount is necessary.
Shared Materials and Components
Just like in the French Region Pack, some of the building components were premade beforehand. This was especially important for the Amsterdam set, as we had two creators working on one pack. Building features such as stairs, railings, windows, some ornaments, and doors were made in advance by Gèze and Gruny.
Growables
Gèze and Gruny were assigned to work on Historic Row housing, as these assets required more time and detail to be developed due to their time period. Feindbold expressed his interest in developing the Medium Density zone. As for me, I grabbed the low residential zones and low rent.
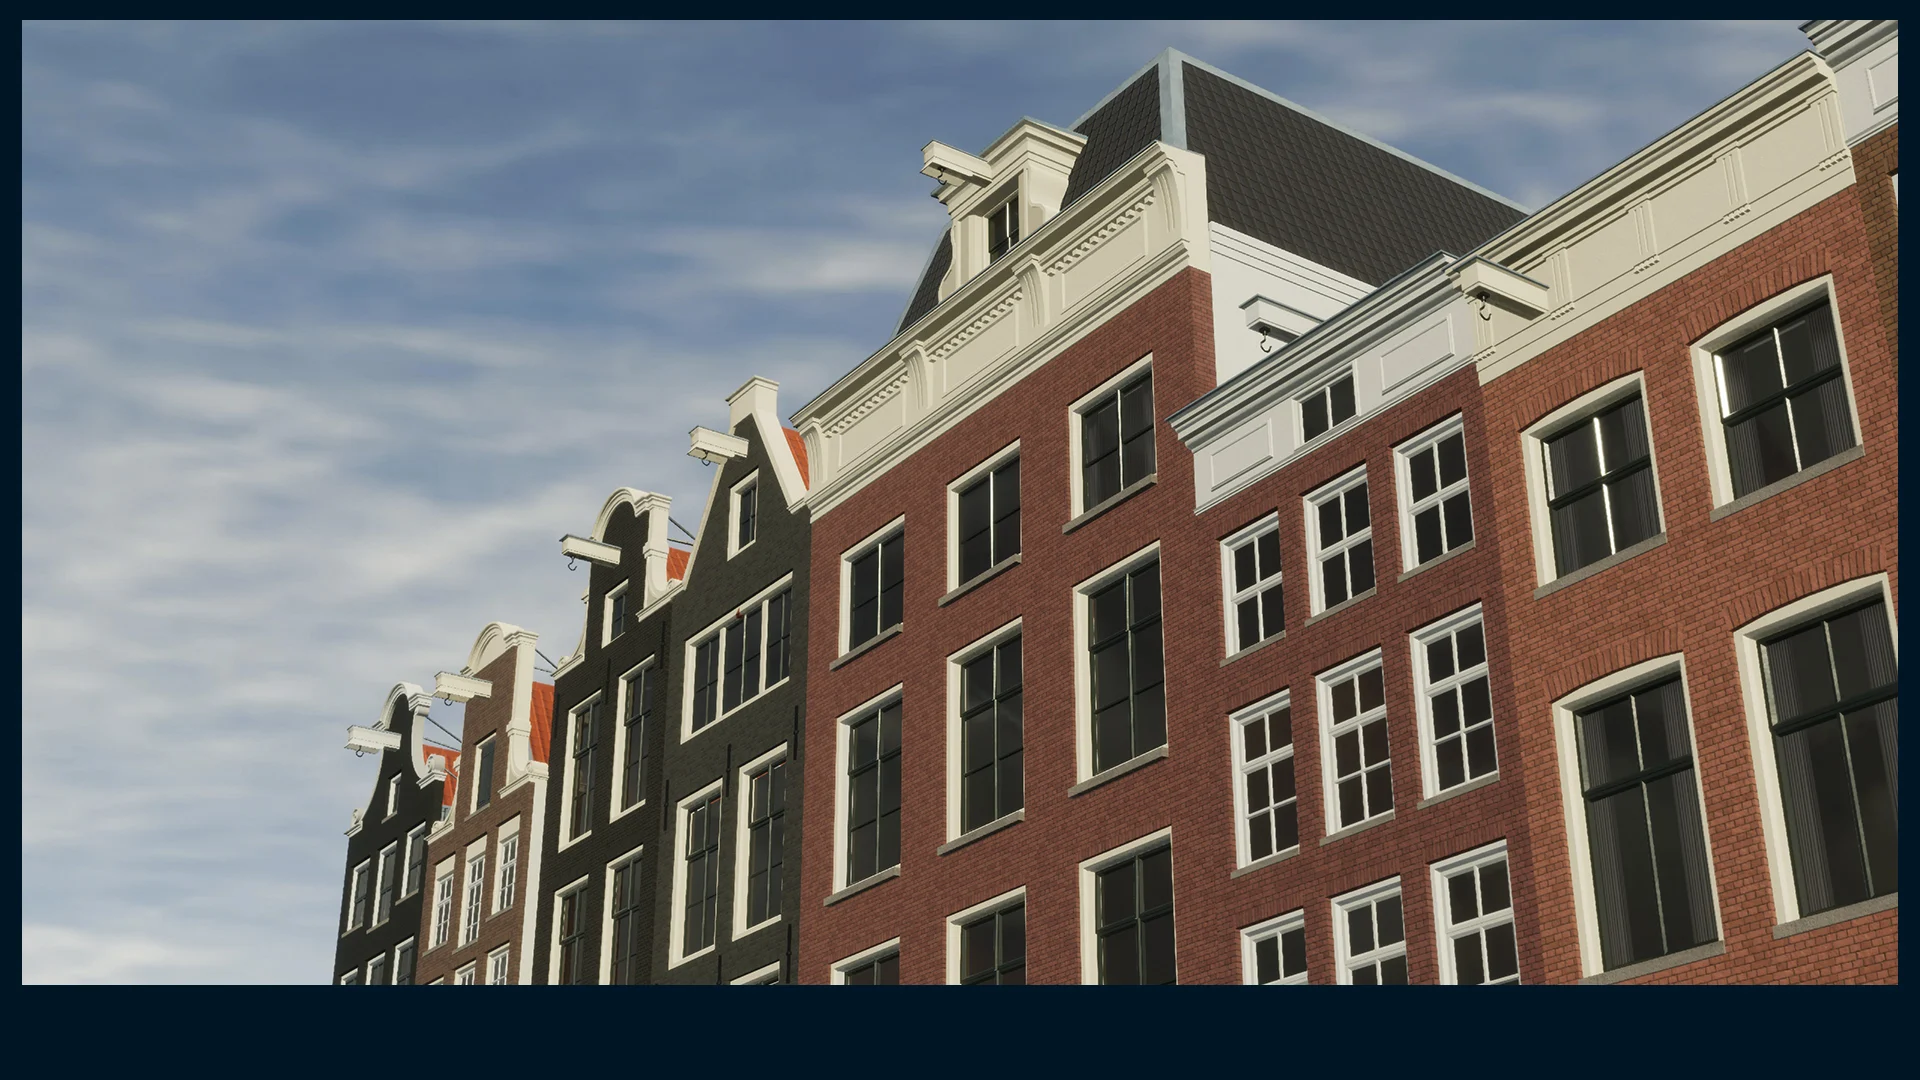
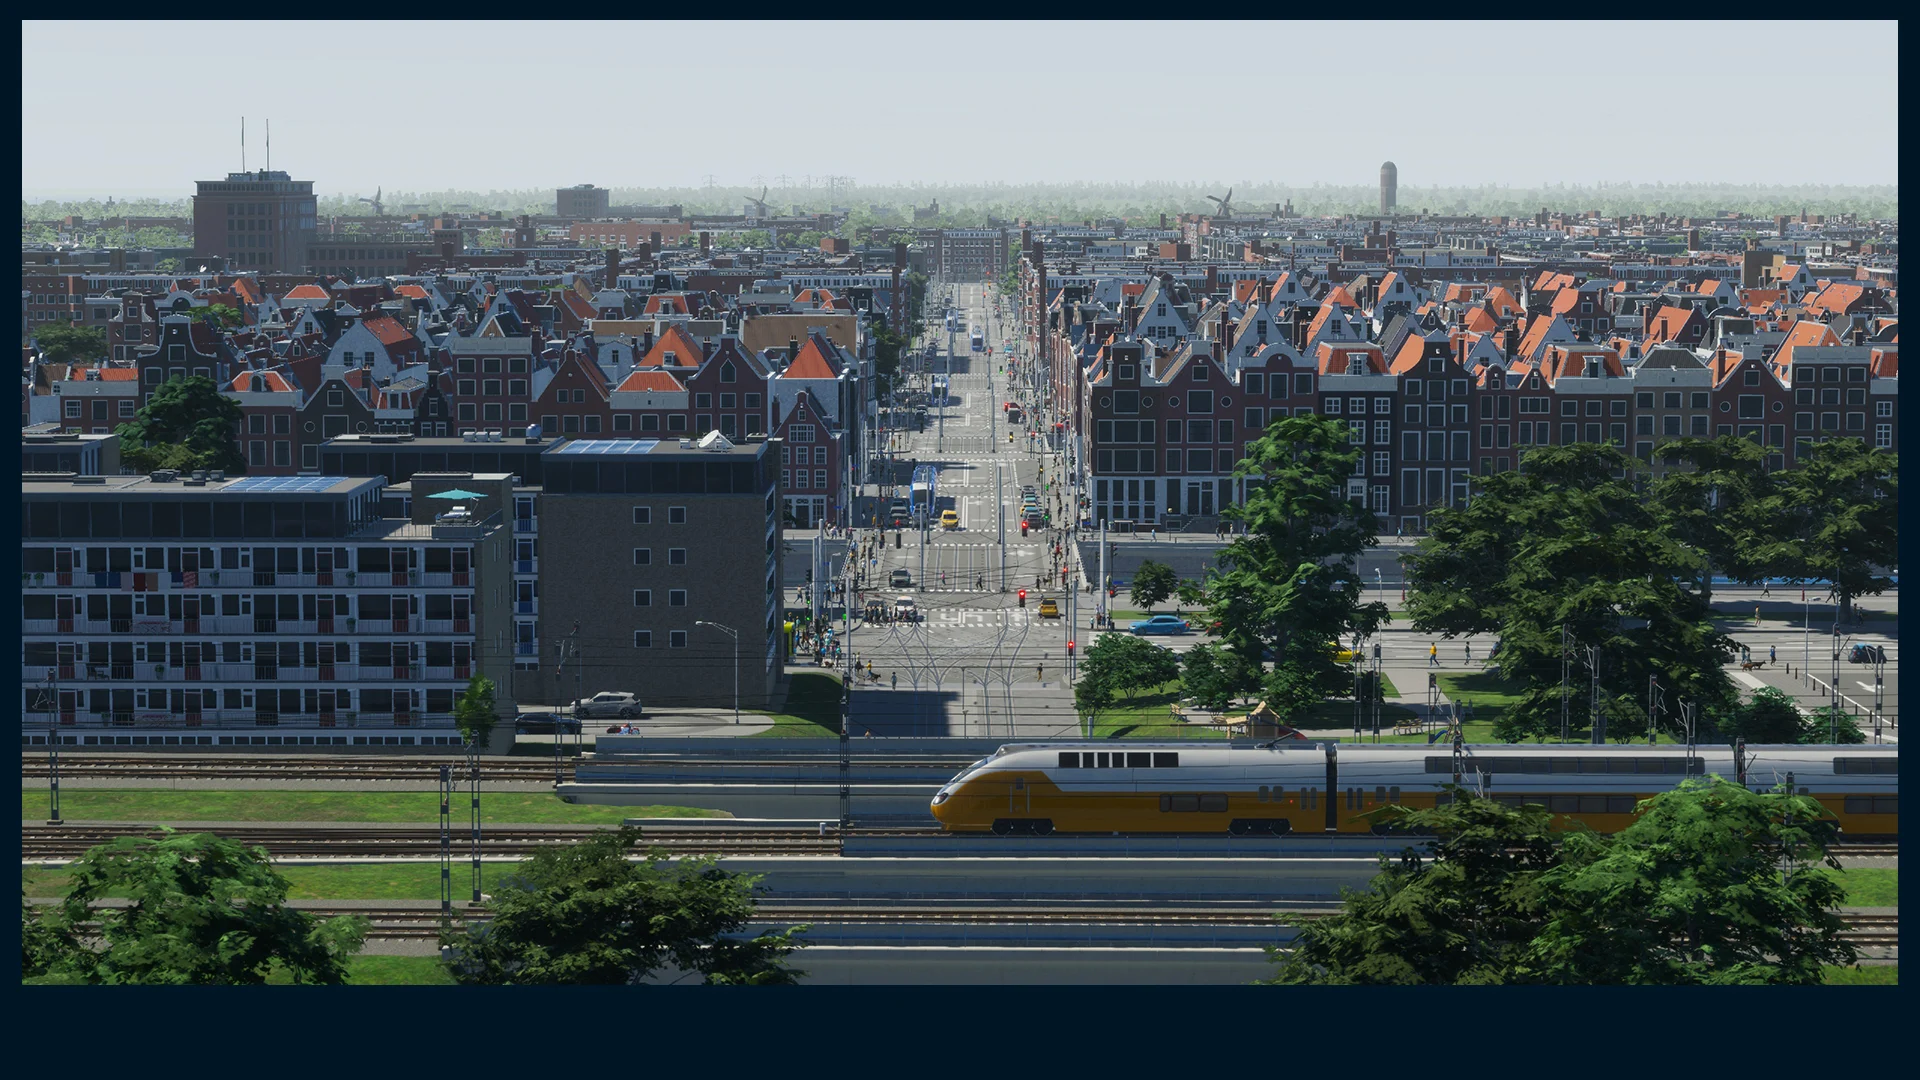
Medium Row Density Zone: Historic Towns and City Centers
The Medium Row Density zone focuses on the historic development of Dutch cities. A couple of locations were used as a reference point - mainly Amsterdam - during the development of this set. In order to reflect the historical progression, the Medium Row set features two distinct sets of buildings split between Level 1 and Levels 3-5. Level 1 features single to two-floor historical medium row housing that represents small towns. Levels 3 and 5 feature classical row housing that is commonly seen in higher-density areas or historic downtowns. Gèze and Gruny also included corner variations in order to wrap up this historical zone nicely.
Level 3 and Level 5 assets are also more ornamented compared to Level 1, which has a much more modest look. For this zone, Gèze also created a set of wall light props that accurately match their real-life counterparts still commonly found around Amsterdam.

In order to nail the historical accuracy, special care was given to detailing, shared across this type of row housing. These included custom window framing or gable hooks that are still used to lift furniture to the upper floors. Staircases and railings are also modeled after real-life inspirations. Similarly, sash windows proved to be equally challenging due to their massive size and deep window frames, which required a custom solution.
The medium row zone works best when you follow real-life inspirations. For tighter city blocks, at least four and up to six cells deep zoning is preferable. That will create tightly packed wall-to-wall blocks. For any other setup where you would like to include some greenery in the backyards, seven or more cells will do the job.
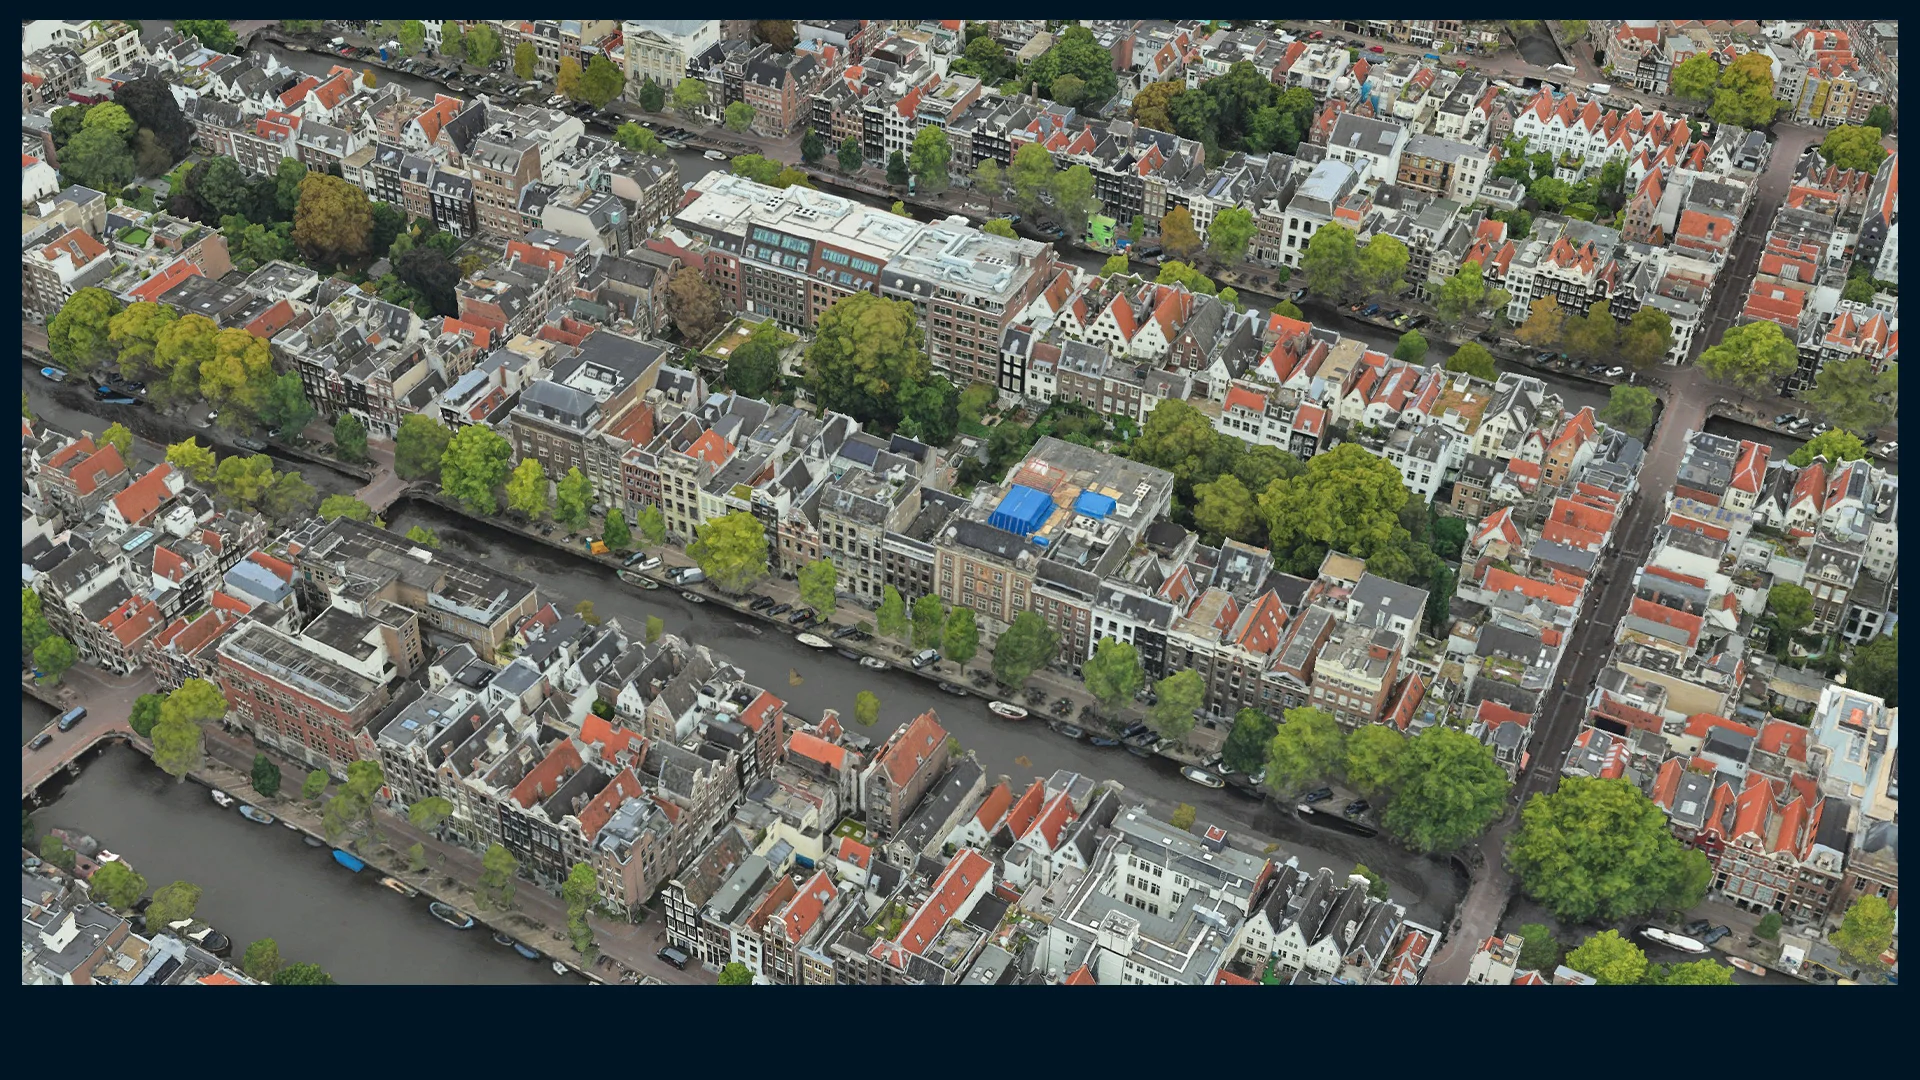
Credits: Google Earth
Medium Density: 1920s
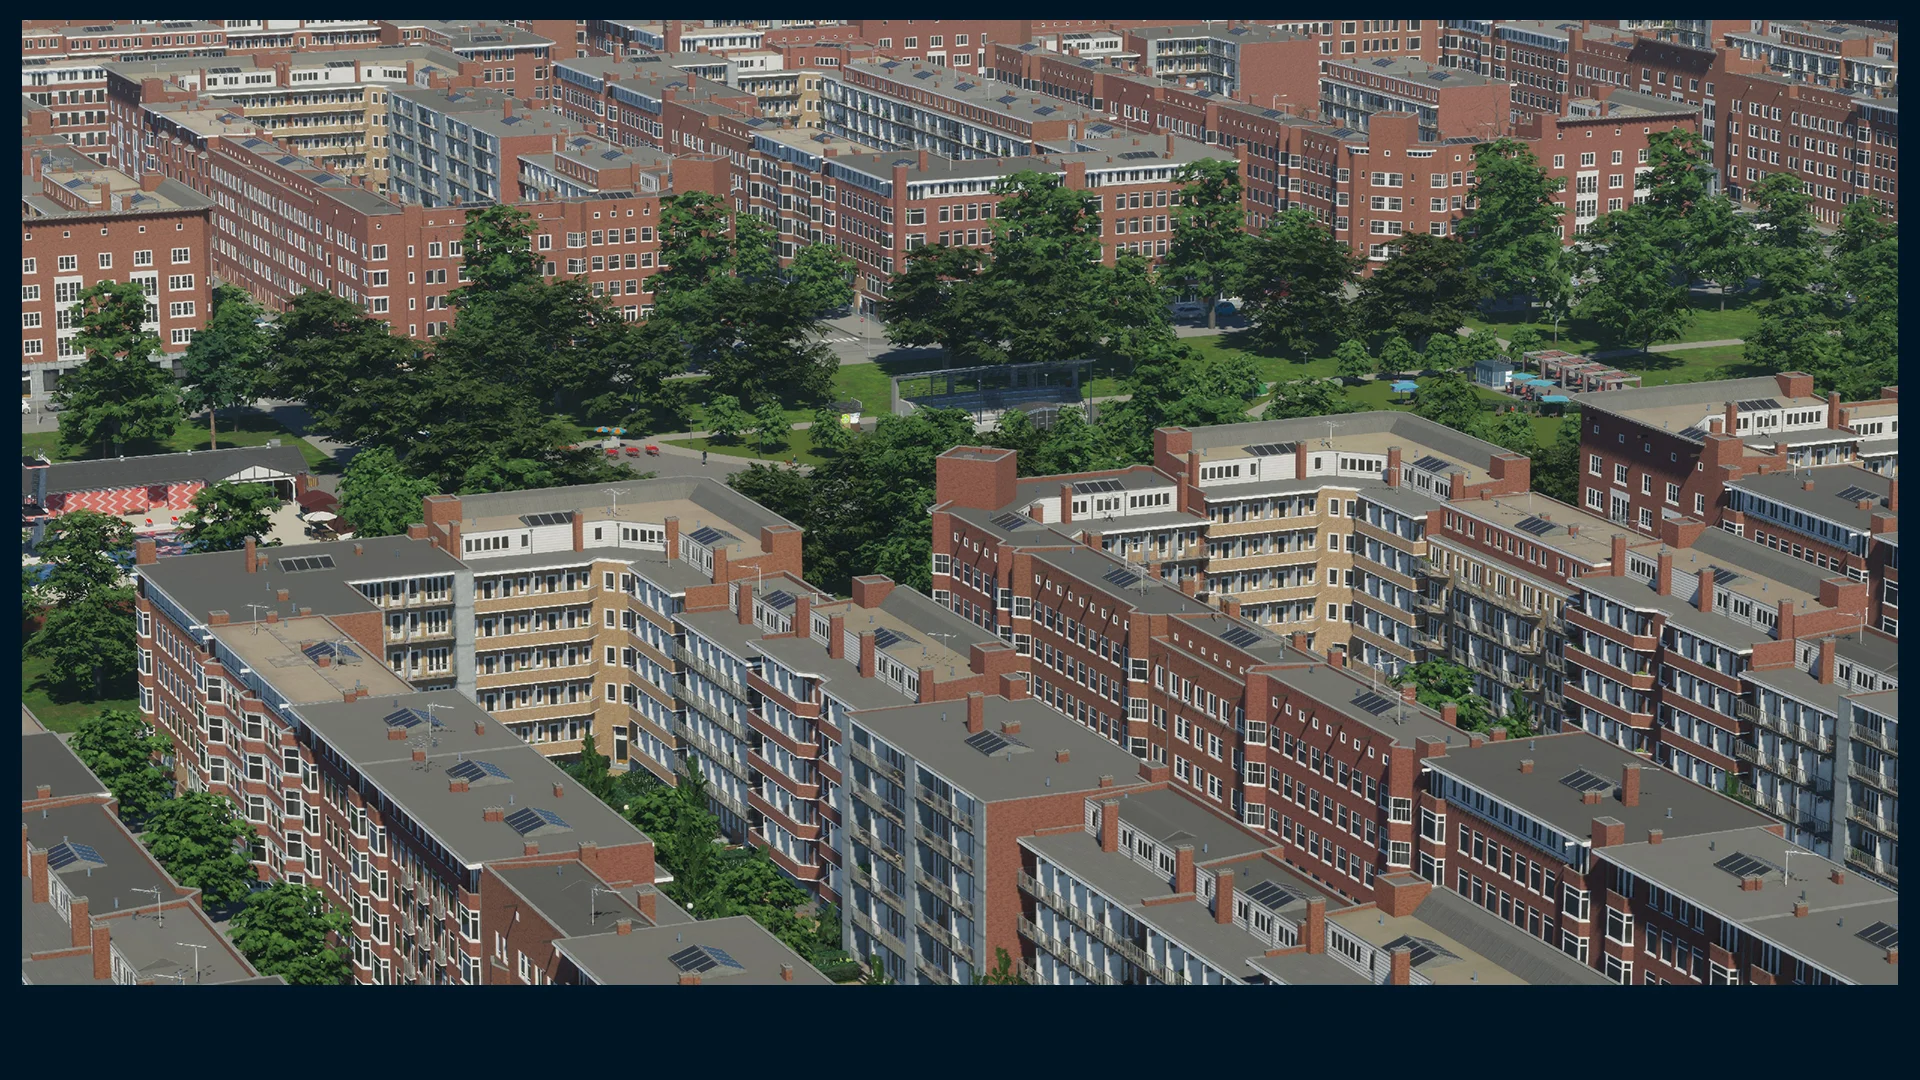
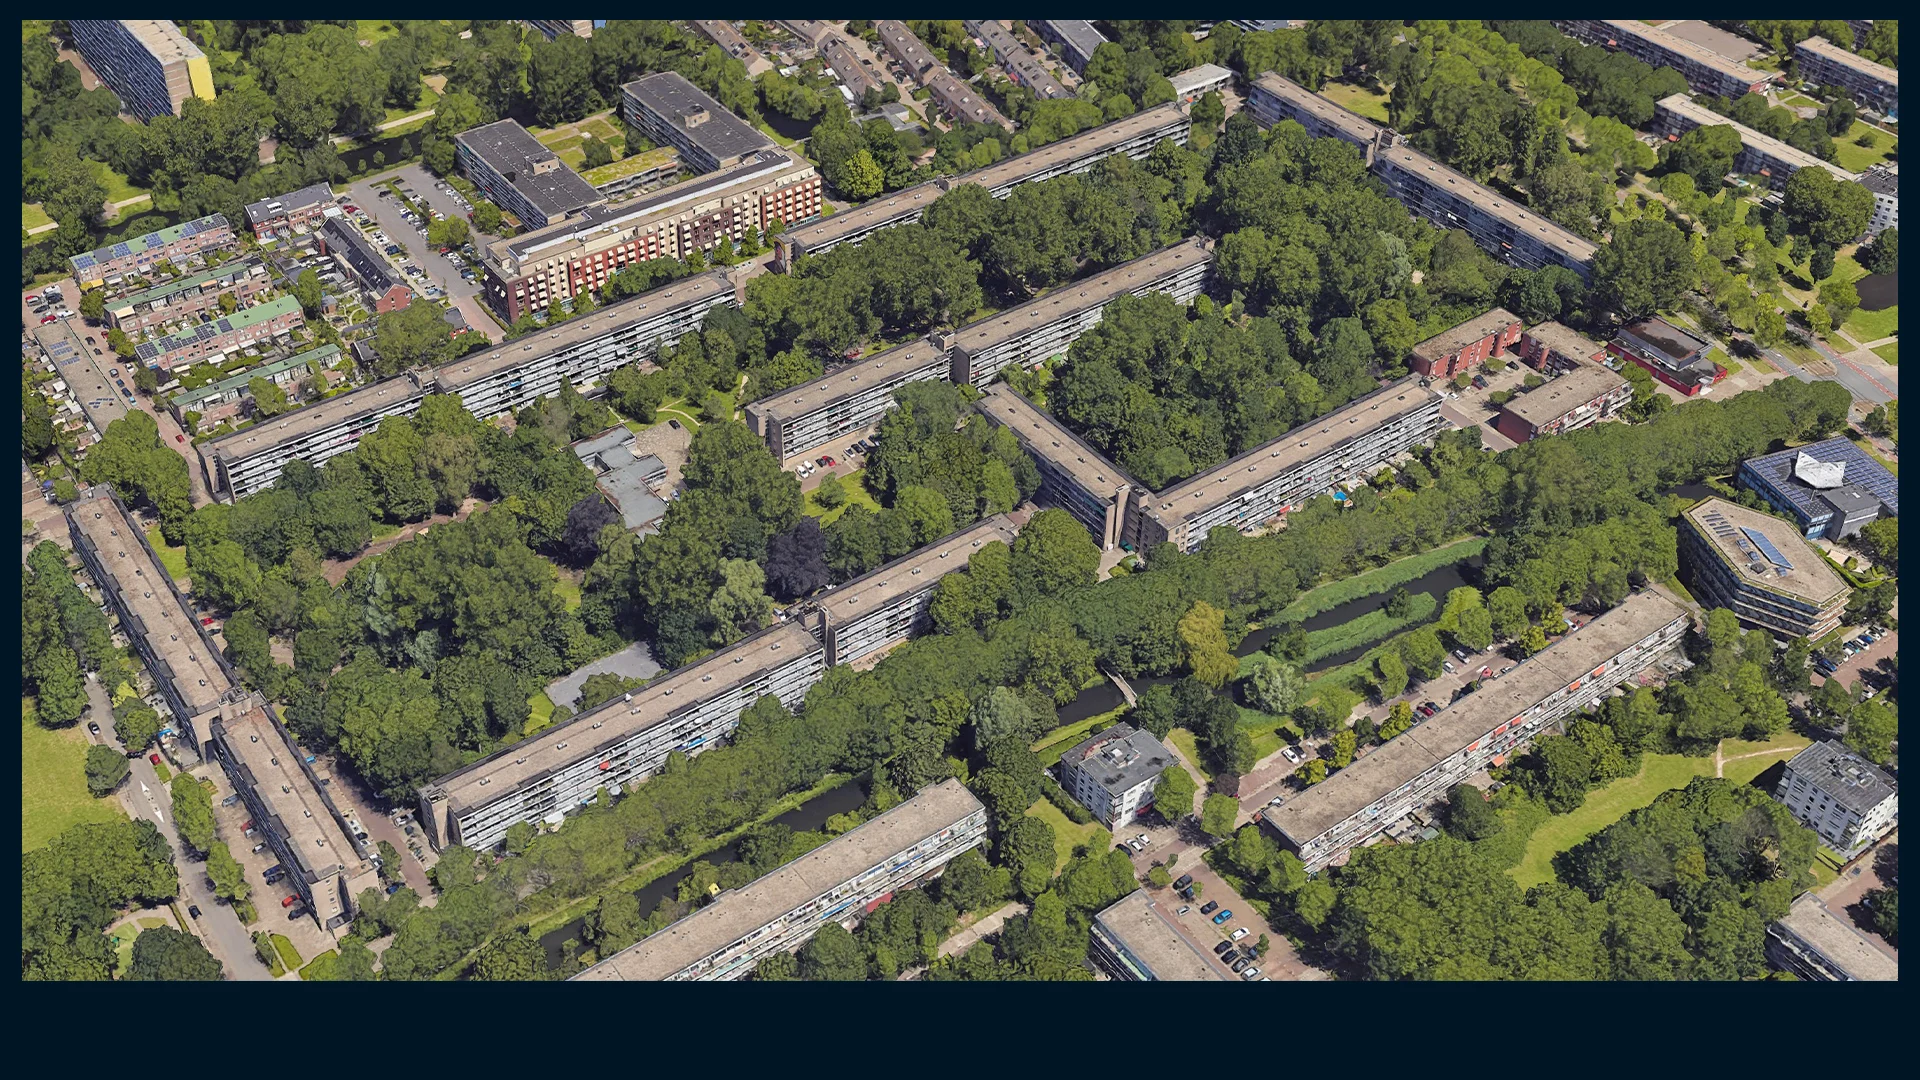
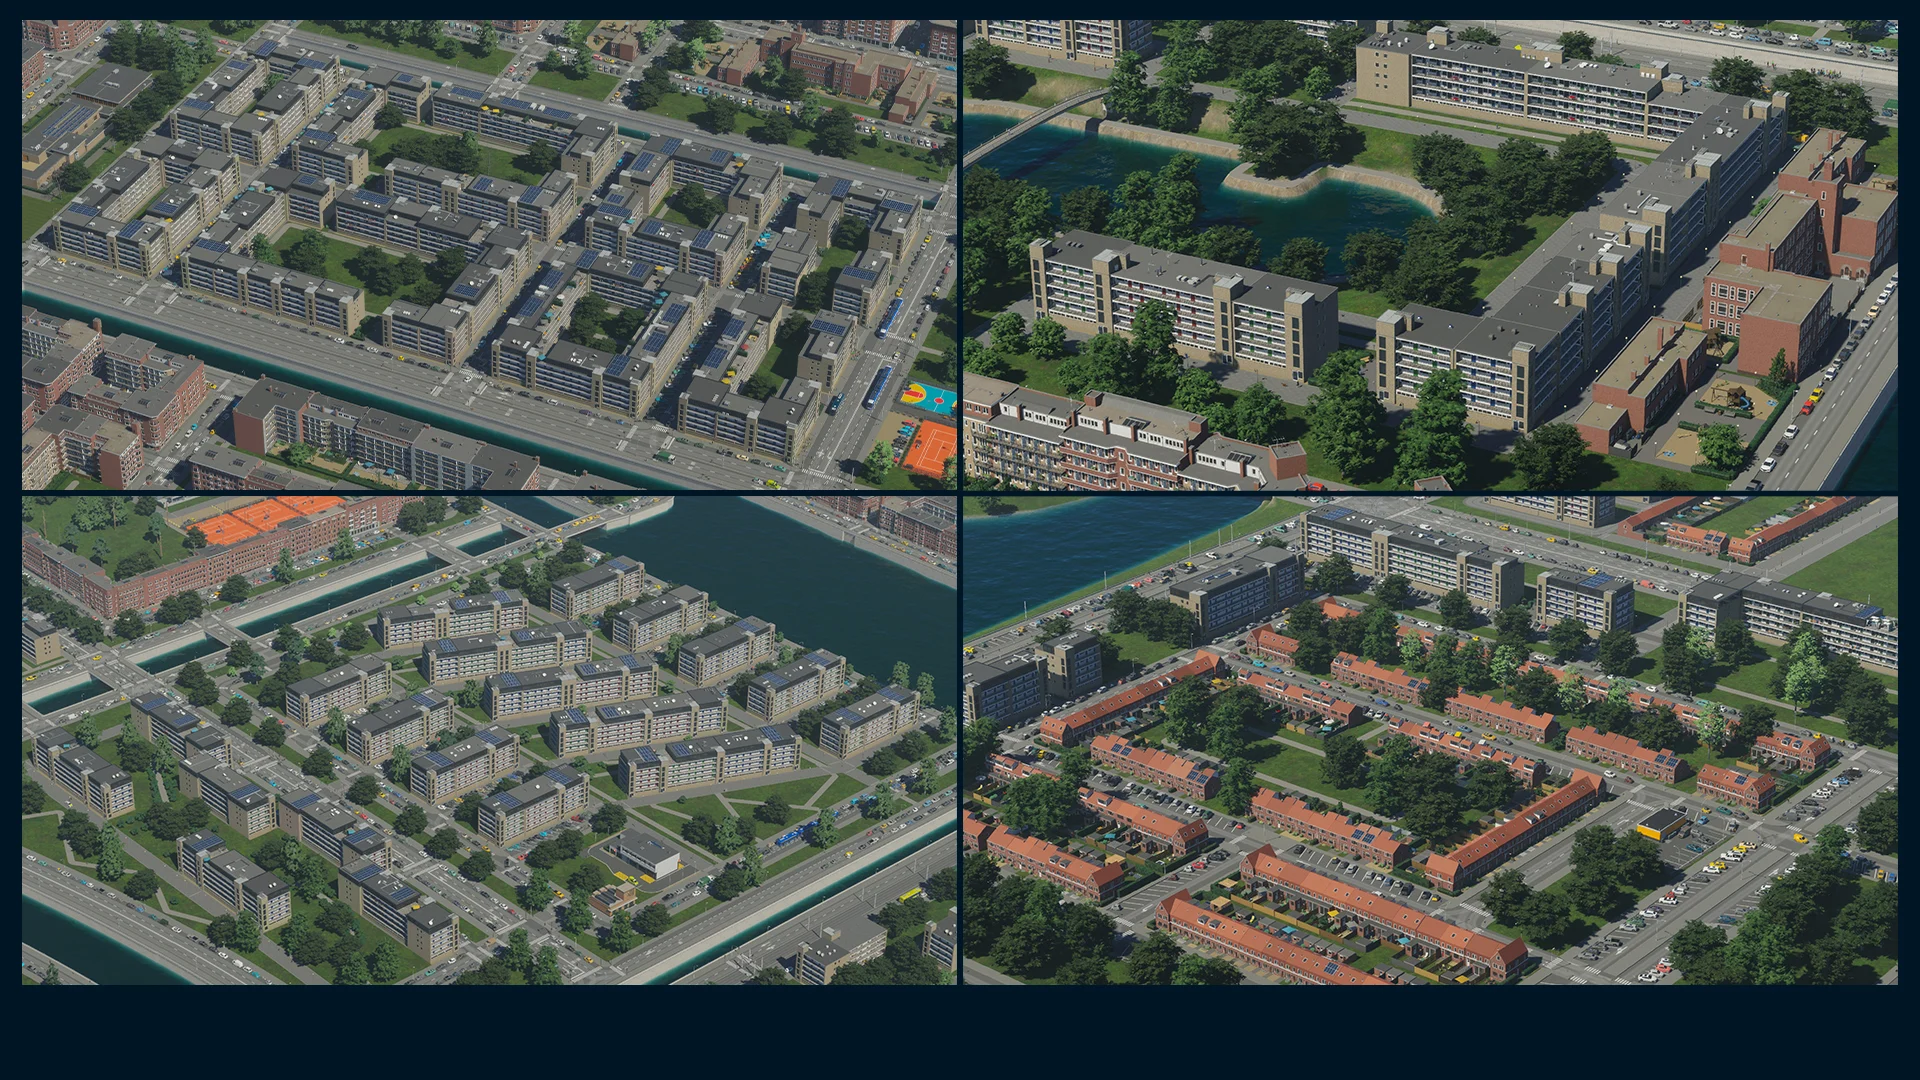
When we initially decided which styles would make it into the pack, the first two picks were Old Town Amsterdam, represented by the Medium Row Zone and the two low residential zones. A common design element of these styles is orange clay roofs. To provide players with more range and contrast, we decided to go with the 1920s housing projects for the Medium Density Zone. Commonly found around the inner cities - especially common in Amsterdam, Rotterdam, and The Hague - these buildings are dominated by brick facades, with lots of balconies in the back and a mix of bitumen and gravel roofs. In particular, Amsterdam became a hotspot for experimental new town extensions in the 1920s, with many local and foreign architects participating. Most of these can be found in the district of Amsterdam Zuid.

Credits: Google Earth
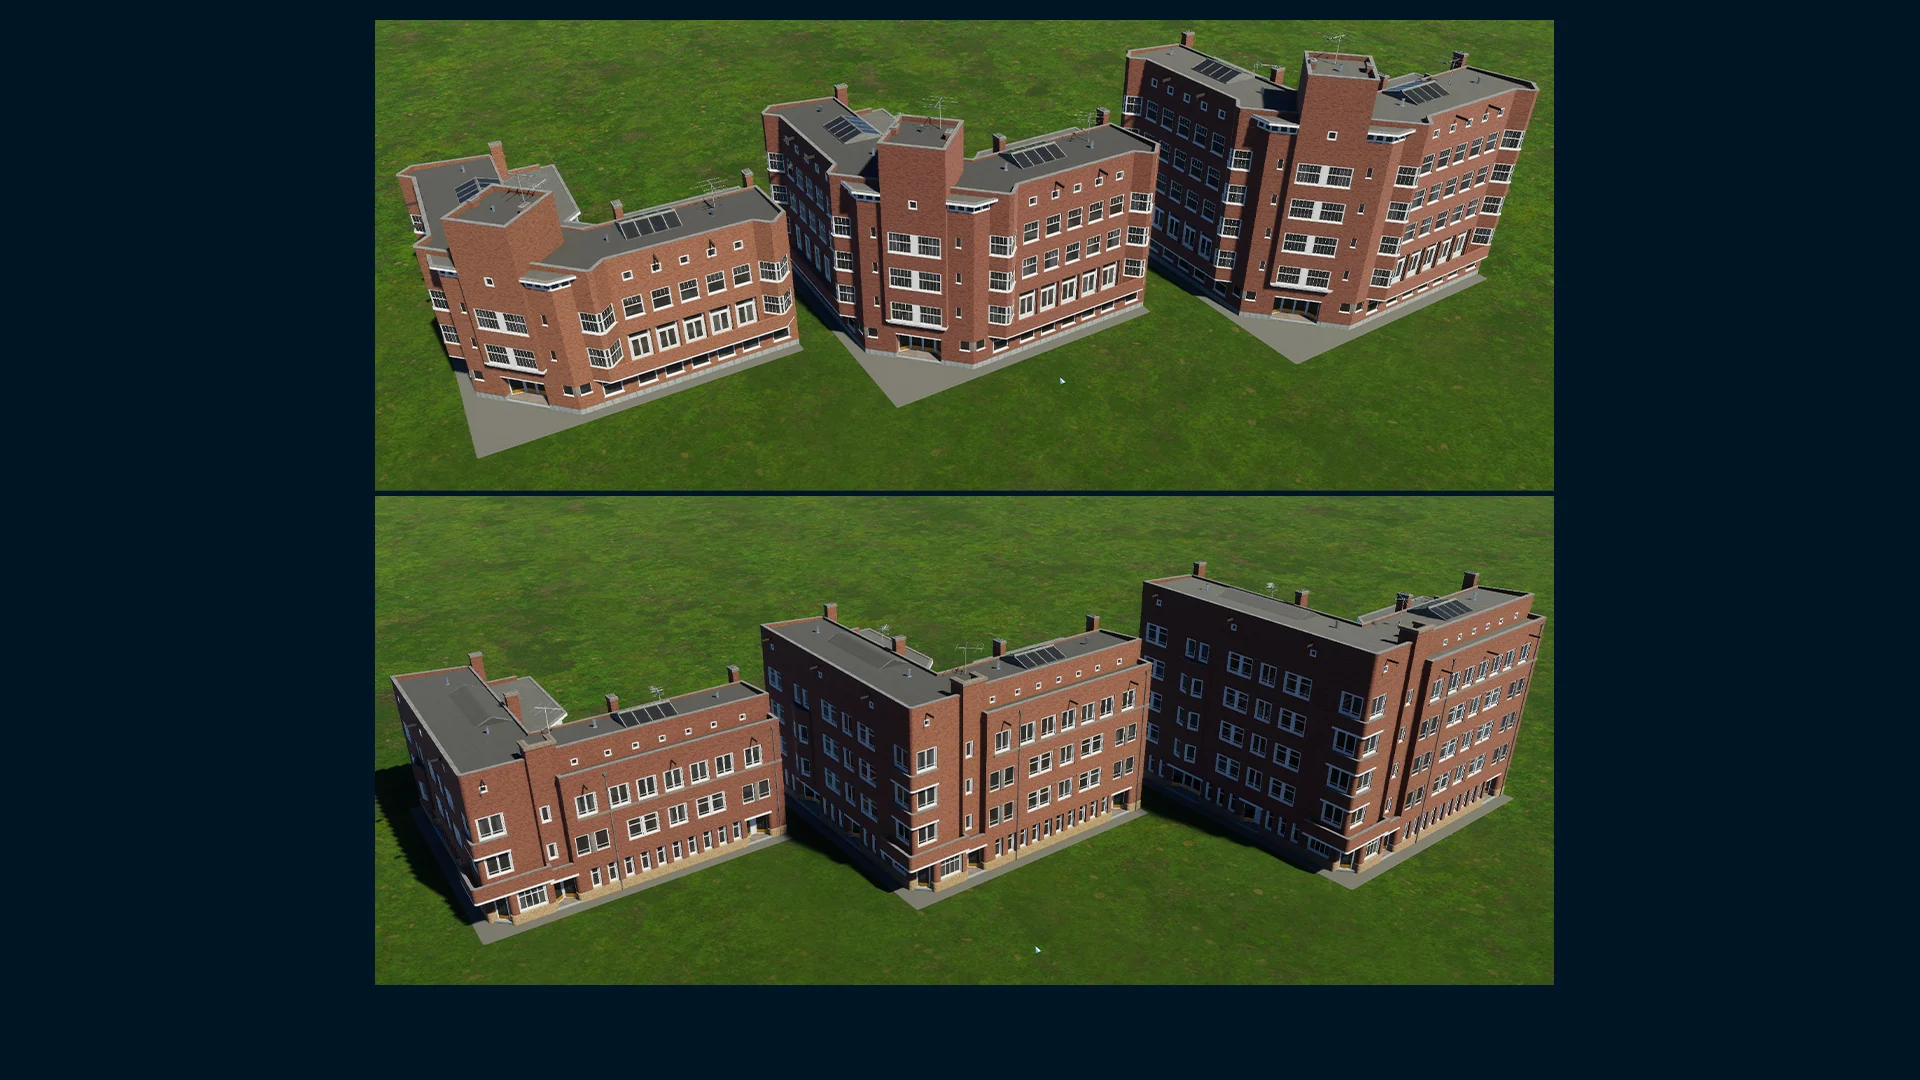
The buildings in this zone are fully colormapped, all sharing a familiar pattern. The first colormap is set to the main brick facade, the second colormap is set to a second set of bricks, usually used on rear walls, and the last colormap is set to the roof material, such as either bitumen or gravel.
As mentioned previously, these 1920s housing projects can be found in many cities across the Netherlands, with the buildings having varying numbers of floors depending on the size of the city. To accommodate this, the Level variants for this zone are heavily inspired by the German Region Pack, with Level 1 buildings starting at 3-4 floors, progressively gaining one floor at Level 3 and one additional floor at Level 5.
When it comes to ideal zoning, most of this zone type are buildings of 3x3. This makes six-cell deep city blocks the ideal size for the medium density zone. You can further deepen your city blocks and allocate space for service buildings, or use deeper city blocks to place parking garages.
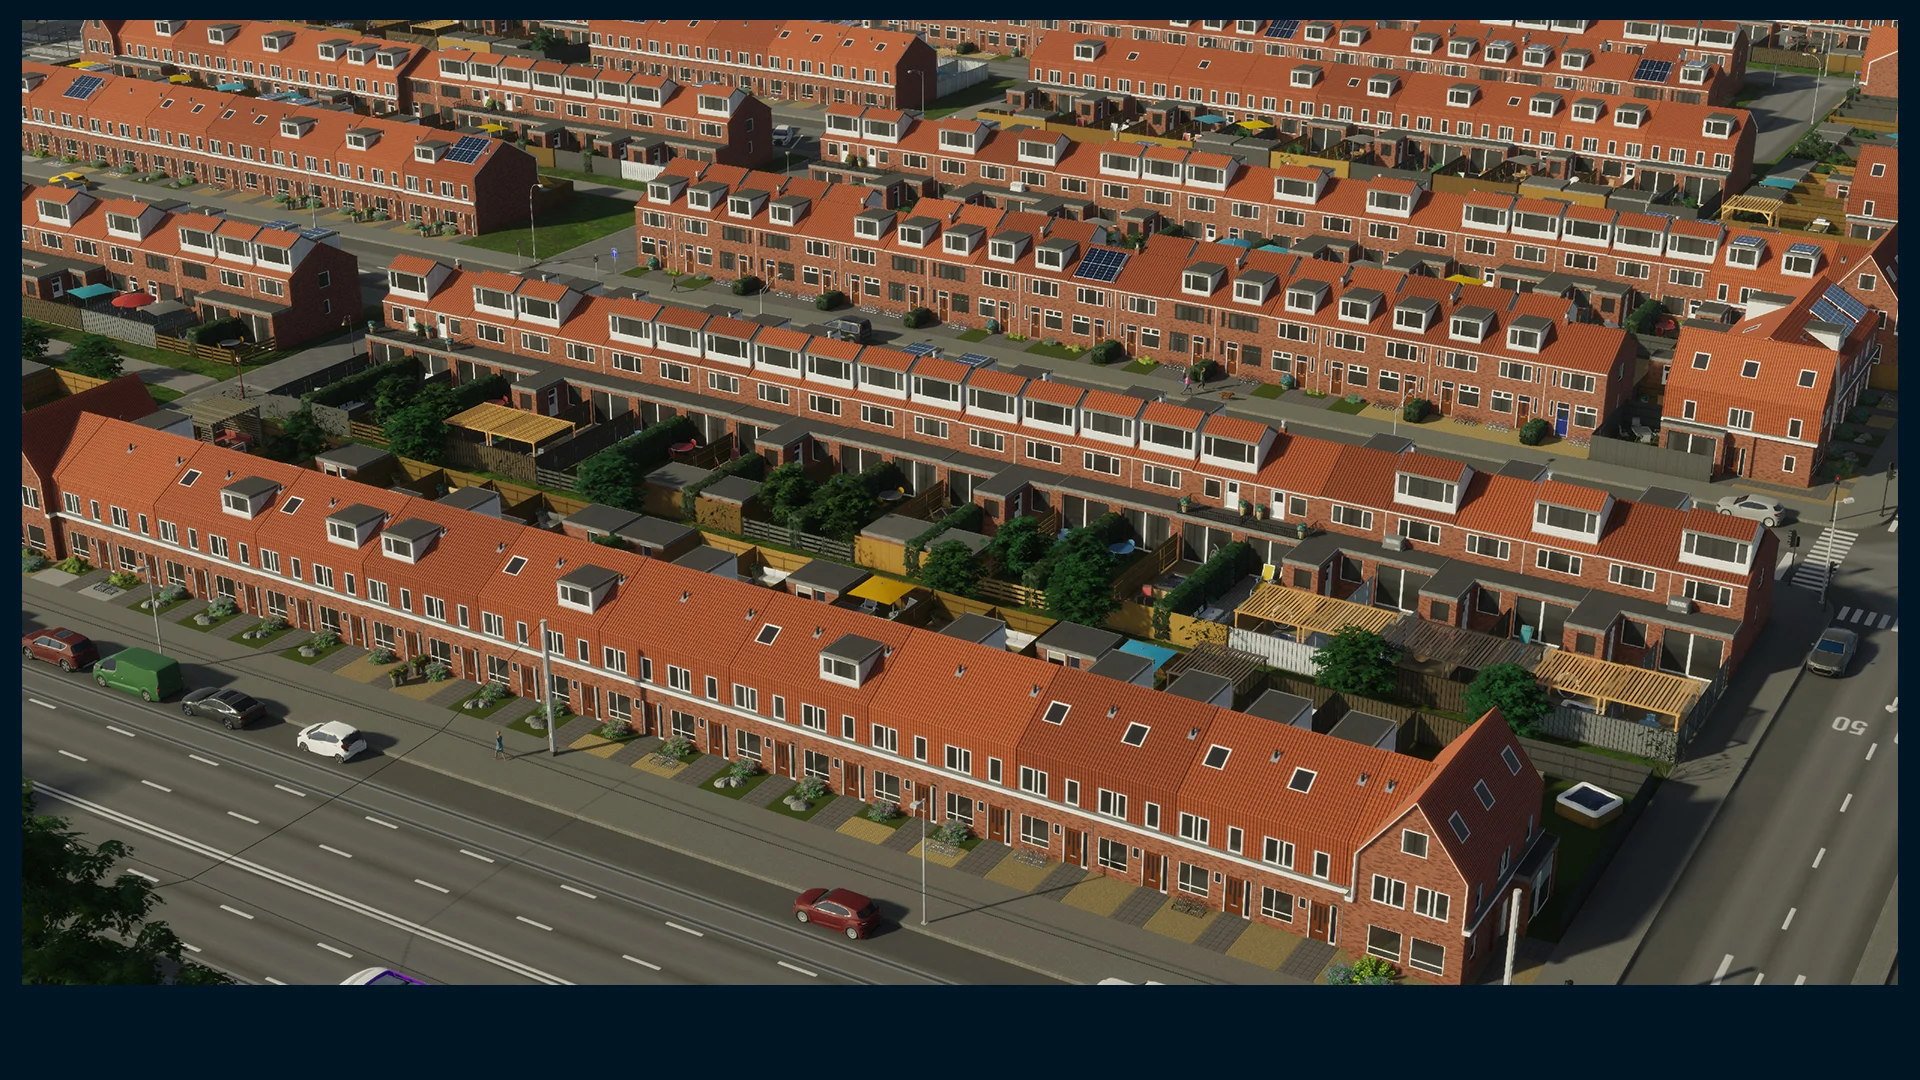
Low Residential - Dutch Suburbia
When you look at the Dutch suburbia, it shares common characteristics across the country. The most obvious one is the human scale of the suburbs. With walkability as a priority, the Dutch low density housing gives more emphasis on a walkable neighborhood, offering open spaces to residents with higher-density housing being limited to low-rise apartments. Houses are usually single or two-floor maximum, with backyards offering some private space to relax.
In terms of architectural style, these suburbs have usually been built as part of residential projects, where entire neighborhoods have been built at once. As such, houses share identical visual properties, with owners doing minimal modifications to their rooftops or reworking their backyards later.
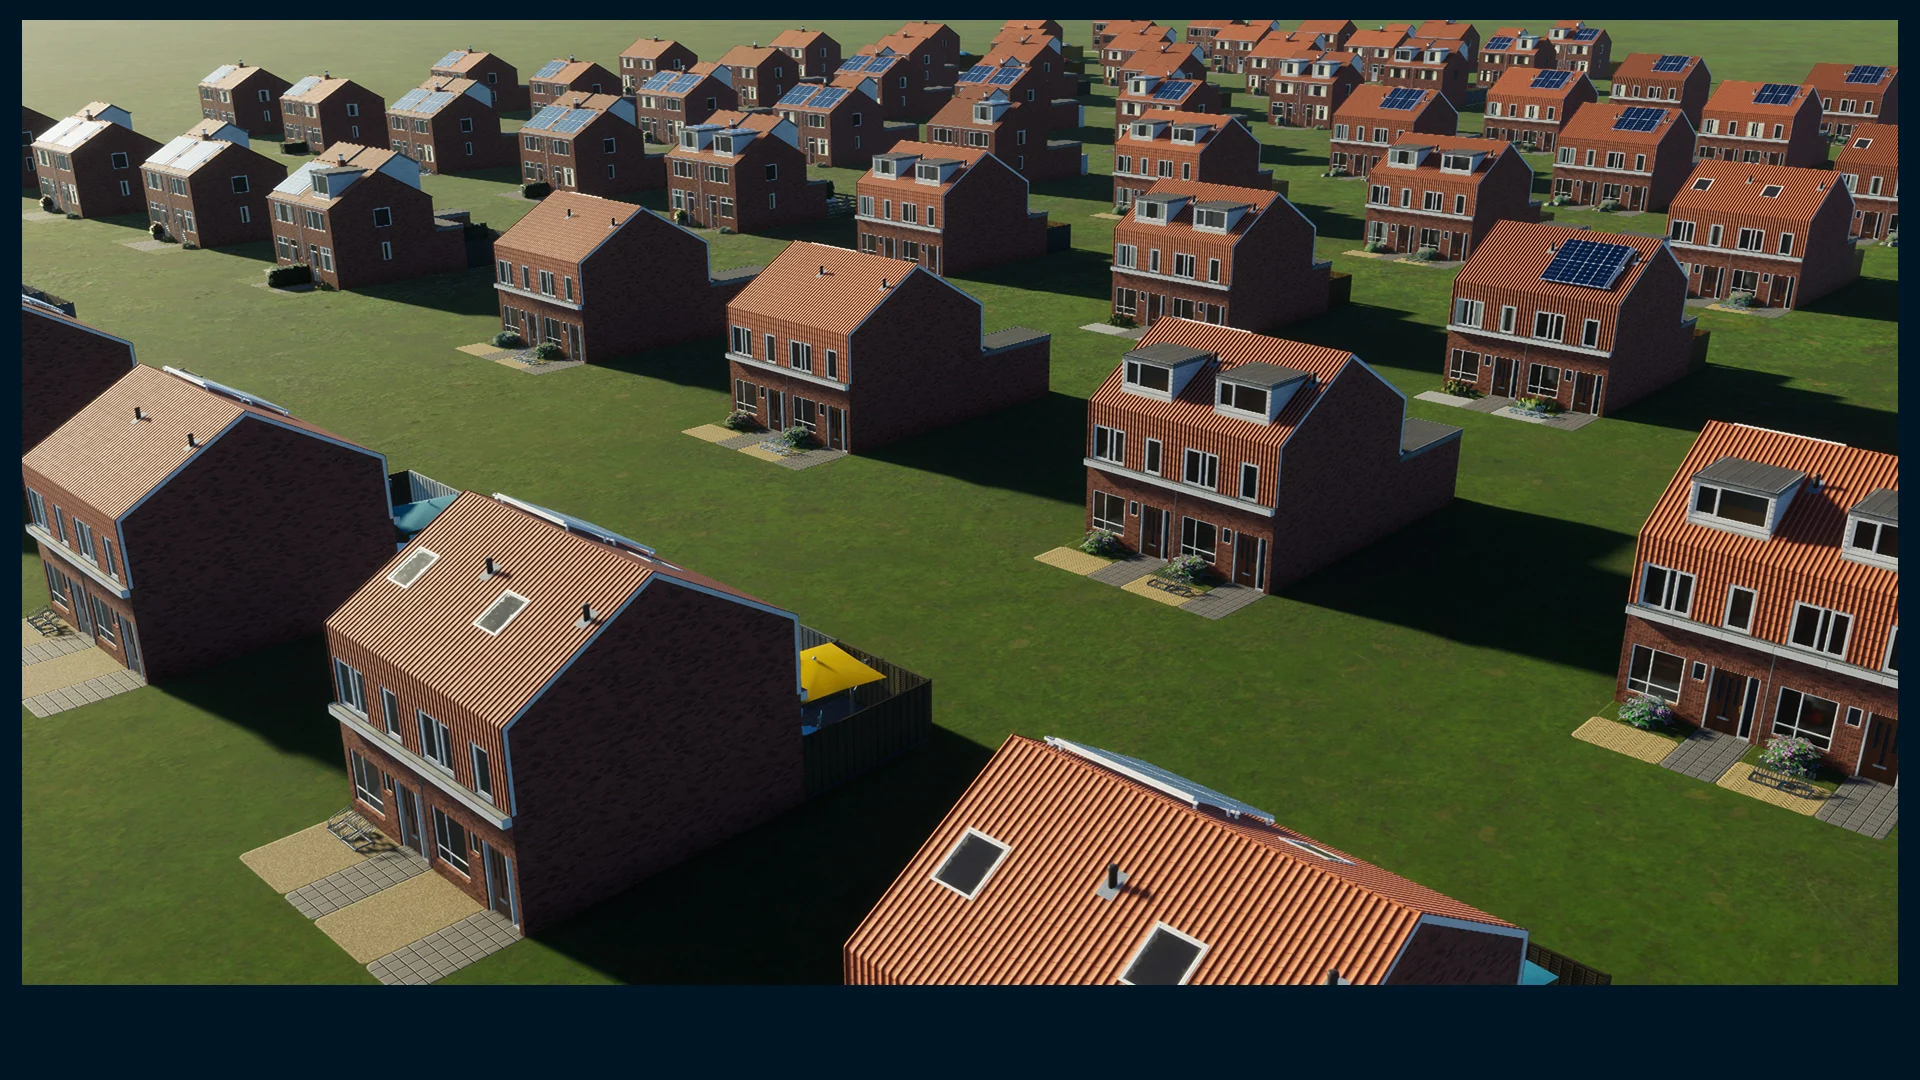
Achieving the same visual feeling in Cities: Skylines II was possible by splitting the low residential pack into two. After looking into the reference material and discussing with my team, I decided to work on two types of Dutch suburban house types, which are very common and generic by their nature.
They are called Gable and Gambrel, named after the distinct roof styles they have.
Both growable styles come with 1x2 and 1x3 lot sizes, which is the standard plot depth for this housing style as well. Just like real life, I also wanted to preserve the sense of ownership of these houses. Both styles come with different backyard decorations, structural differences, and rooftop details, to mimic the personal modifications landowners might make. These changes are also reflected in building progression; as you approach L5, you will notice more of the houses are getting dormer upgrades or installing solar panels on the rooftops as the houses are getting wealthier. Color variations are also used on these assets to make them weather differently compared to each other.
With all these effects and art design combined, you will achieve a uniform but also diverse low residential Dutch housing, which you can zone or plop in a variety of ways to support the suburban development of your cities. You can easily grid zone an entire area to check for real-life references, and mix both zones with low rent to achieve a more realistic suburban district.
Low Rent - Post-War Redevelopment
Early on, I had a couple of alternatives to work as a Low Rent solution. They varied from tall social housing buildings from Rotterdam to low-rise and modern low-rent housing buildings. Ultimately, I settled on a low-rise, low-rent residential complex as an inspiration.
Credits: Google Earth
The goal behind this decision was to create a coherent art that can work as low rent but also as low-rise apartment buildings, which can be zoned around other growable zones of the pack, without making it stick out too much.
I also wanted players to experiment and create their own housing complexes by using the zoning tool creatively. Trying to encourage this creativity, we created a custom zone standard for the low-rent houses; the entire low-rent zone has the same two-unit depth, however, they expand in width up to 6 units wide, while offering multiple variants for larger lots, including pedestrian passages and walkways to walk across the building complex.
This way, players can zone low-rent housing complexes along a road and create long housing complexes, as observed across the Netherlands. I also included 2x2 corner variants for the low rents to create usual L-shaped social housing buildings, which can sometimes include a primary school, a small supermarket, or a park/field in the courtyard.
Just like low residential, there is also a sense of progression in the Low Rent from Level 1 to Level 5. As Level 3 receives an extra floor, the transition from Level 3 to 5 is more interesting, as the final building level gets a loft/open rooftop. After all, just because it’s low rent doesn’t necessarily mean that citizens can’t enjoy a good rooftop space.
Service Buildings
Just like growables, we also distributed service buildings between creators, based on interest. The majority of the buildings were decided on together, with some being added on the creator’s own discretion. The most important aspect of this was that all service buildings had to be usable with most, if not all, zones of the pack seamlessly.
Fire Stations
I decided to make two variants of fire stations, in order to offer different solutions for low-density areas and urban city centers. The small fire station offers two trucks of fire suppression and carries a modern design, based on a real-life building in Utrecht. As it’s a small station, it doesn’t offer any upgrade.
The large fire station is inspired by the one in Amsterdam, and it’s perfect for fire stations that need to be located in a city center. It offers more fire truck capacity and features additional upgrades that can further increase its capacity or include a helipad.
While it’s colored white as its real-life inspiration, it’s still following the colormap standards we applied for the pack.

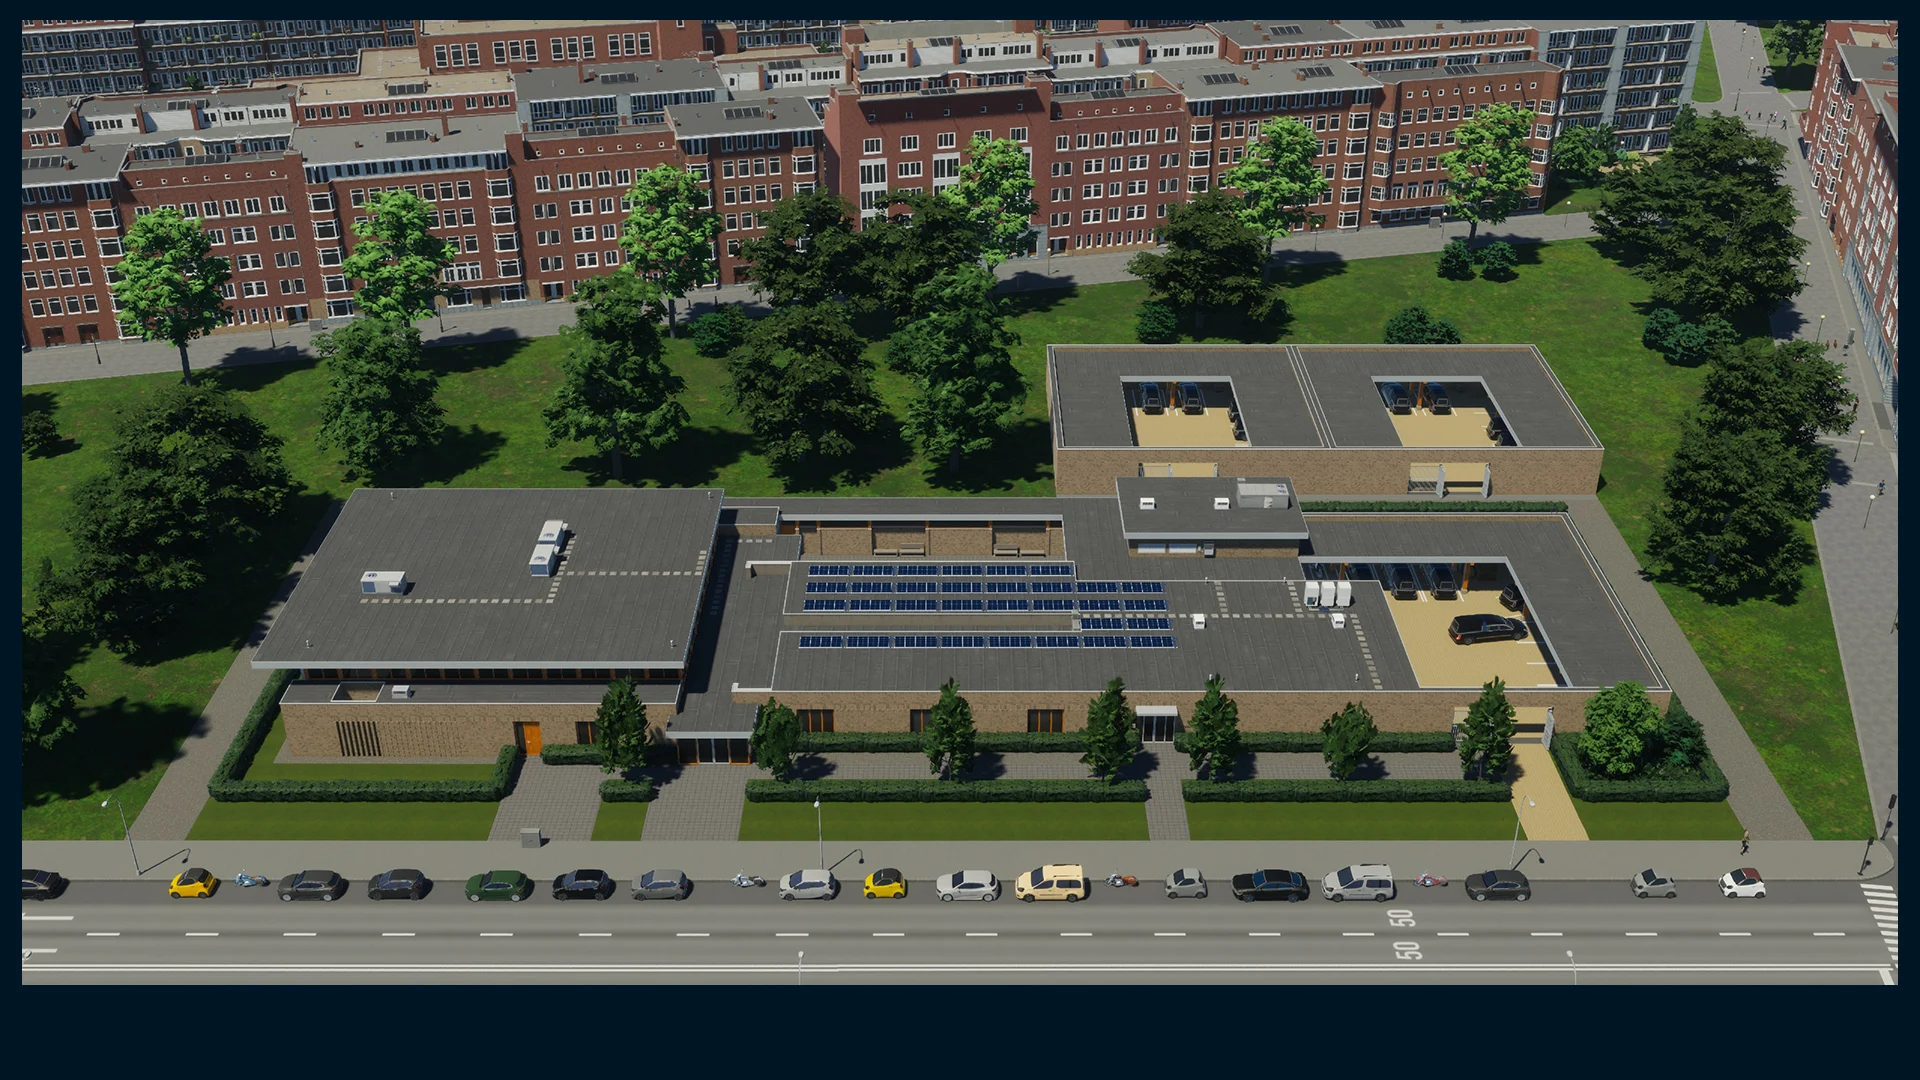
Medical Clinic
Due to how medical services work in the Netherlands, it was actually challenging to find a small clinic that could fit into the footprint that I wanted. I finally decided on this emergency service building and retrofitted it as a medical clinic that can dispatch ambulances and also treat the injured/sick citizens. The generic design allows it to be placed around any residential or even industrial zones.

Hospital
Gruny worked on the hospital building that is inspired by a building with similar functionality, located in The Hague. In terms of design, it carries the 1920s early modernist/Amsterdam School architecture, which is the common theme across most of the service buildings of the pack. As a hospital, it sits somewhere between the base game clinic and the base game hospital and is priced accordingly in terms of maintenance and upkeep costs. It features two upgrades that can increase patient capacity and quality.

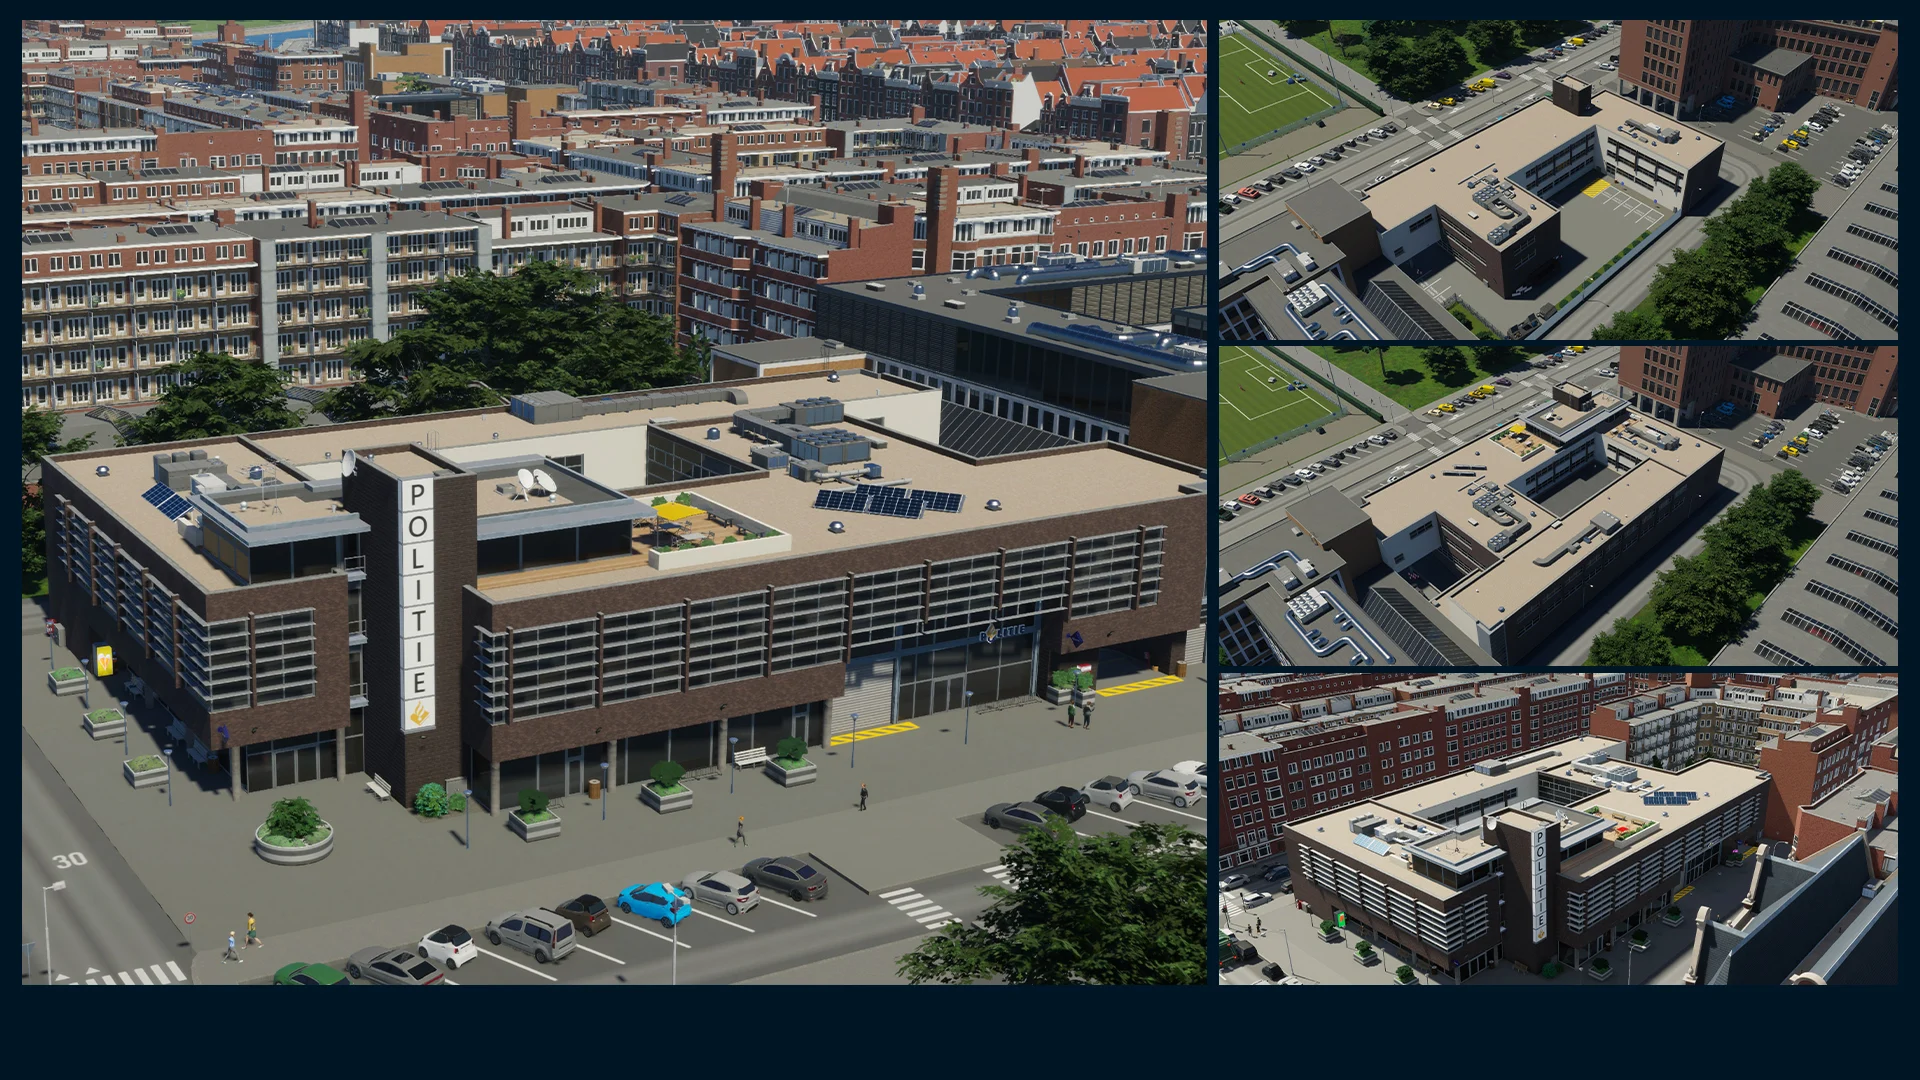
Police Station
The Region Pack contains one police station that can be used as a standalone or wall-to-wall building, which is inspired by a multifunctional building located in The Hague. Gruny also included two upgrades, the Administrative Wing and the Investigation Unit. The former adds extra patrol cars and increases jail capacity, while visually turning the building into a proper standalone structure. The Investigation Unit introduces the intelligence wing of law enforcement, dispatching special patrol vehicles.
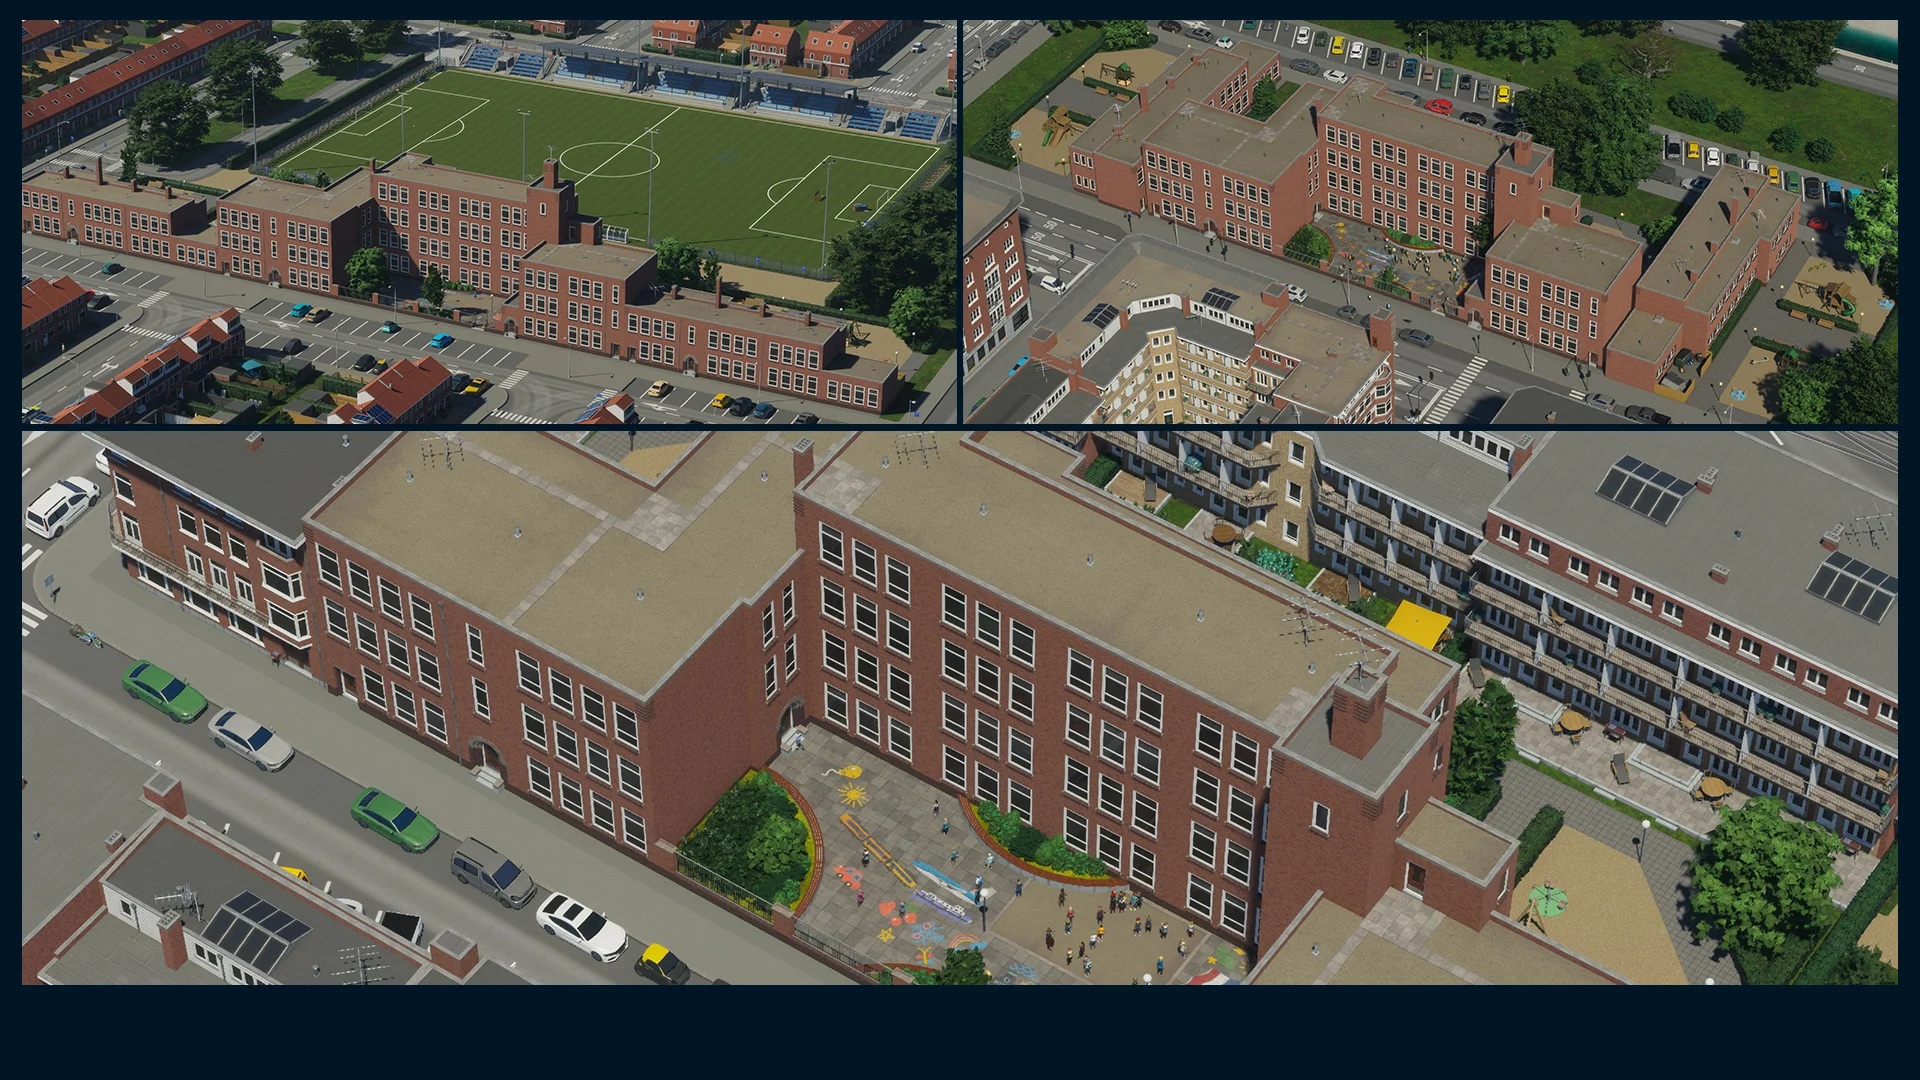
Elementary School
Feindbold picked an elementary school located in Rotterdam as inspiration. The asset is designed to be wall-to-wall, allowing it to be placed in the middle of a medium-density block and blend in seamlessly. For players wishing to use it as a standalone structure, classroom upgrades can nicely wrap around the building and gradually reduce its footprint to be placed next to low-density housing or in a block of its own.
Its playground extension features chalk drawings on its surface. As an Easter Egg, I sketched some extras on my drawing tablet after asking the team to pick their favorite Dutch “thing”. You could probably notice which ones were mine when you look at the building in-game.
High School
Gèze was responsible for the high school, which was inspired by its real-life counterpart located in Amsterdam. It’s one of the two tallest buildings in the entire pack, and it certainly towers over most of the growables. It features two upgrades that increase student capacity and student wellbeing. The upgraded building is also partially wall-to-wall friendly, as it provides an arched gateway to the parking lot in the backyard.

College
Whilst initially, we did not plan to make a college, Gèze found a nice historical building that worked perfectly both as a school and a landmark. Built in Amsterdam in the 1630s, this congregation hall now serves as a college auditorium. While it may not have the highest student capacity, it certainly shines with its looks. It closely follows the real-life design, whilst adjusting to our in-game corner set-up. It generally looks best when placed amongst the historic row houses, but it can work just as fine surrounded by the 1920s buildings.
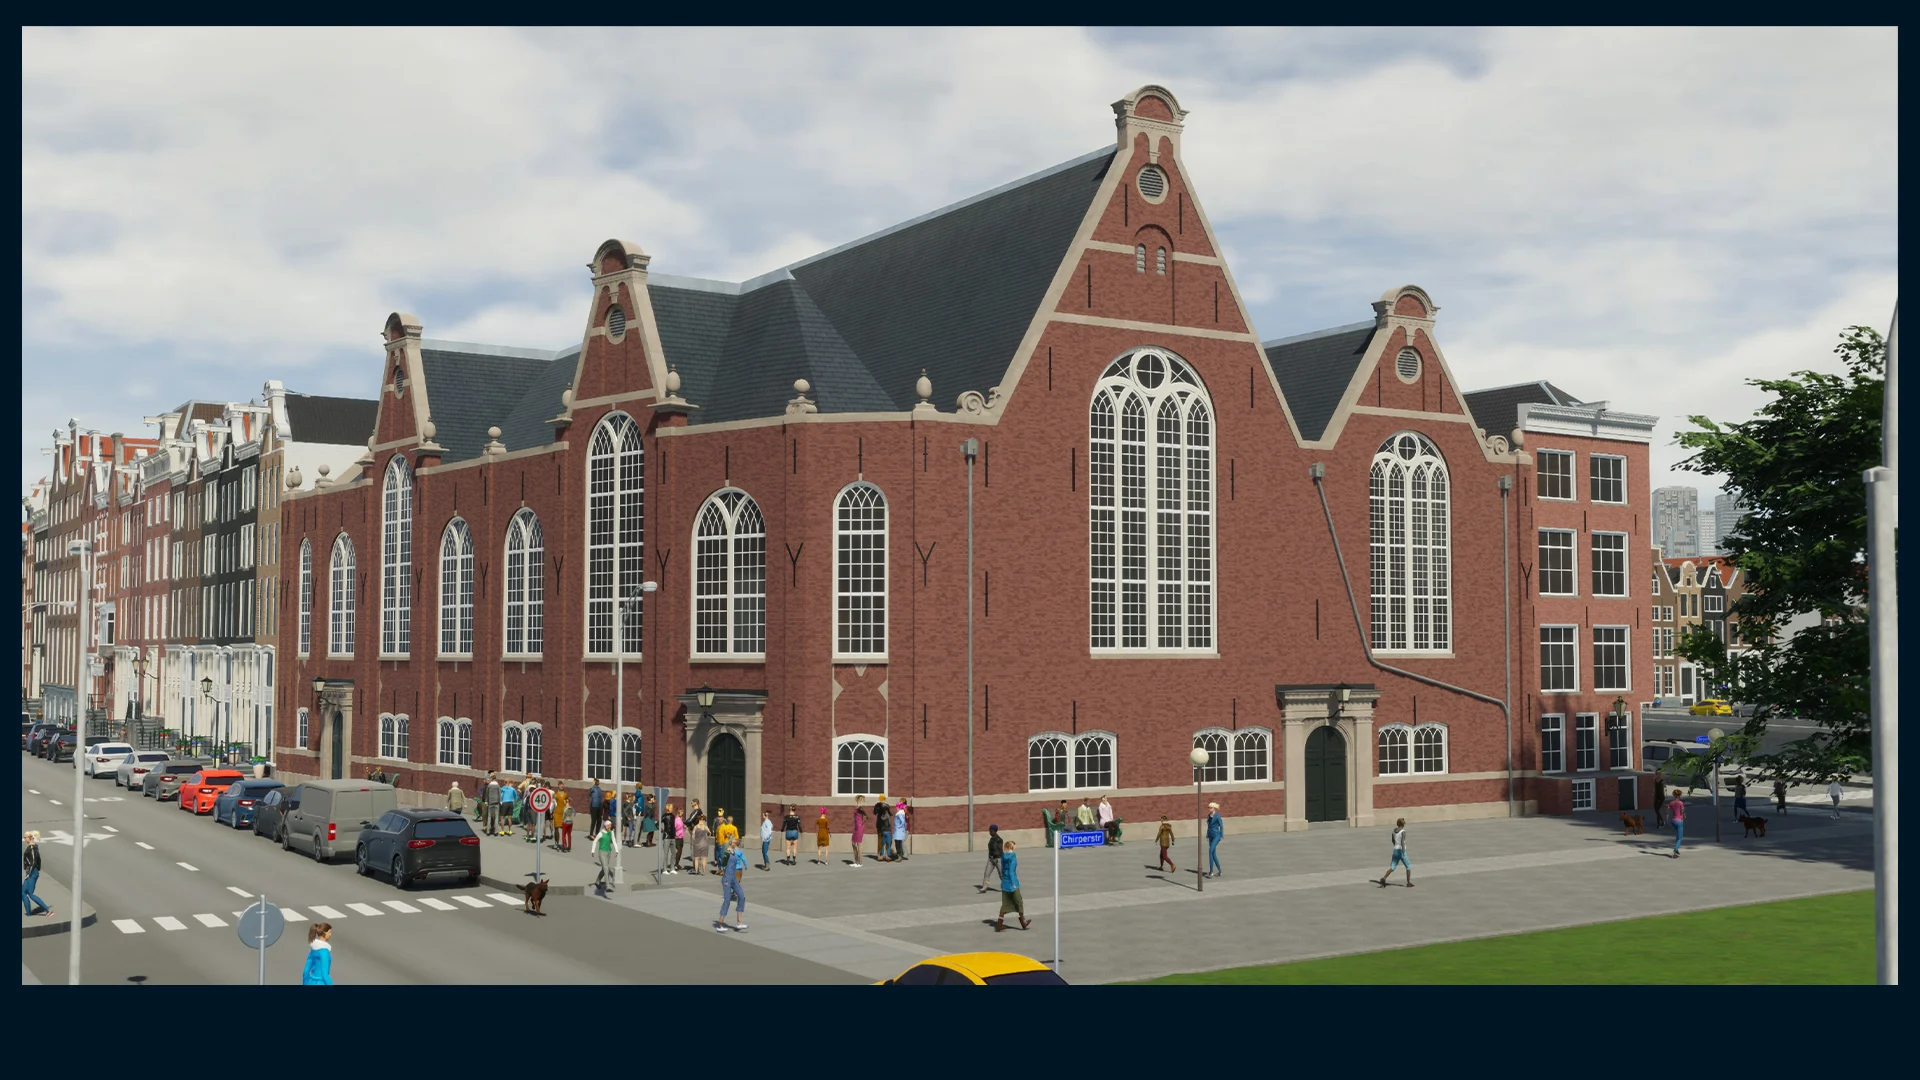
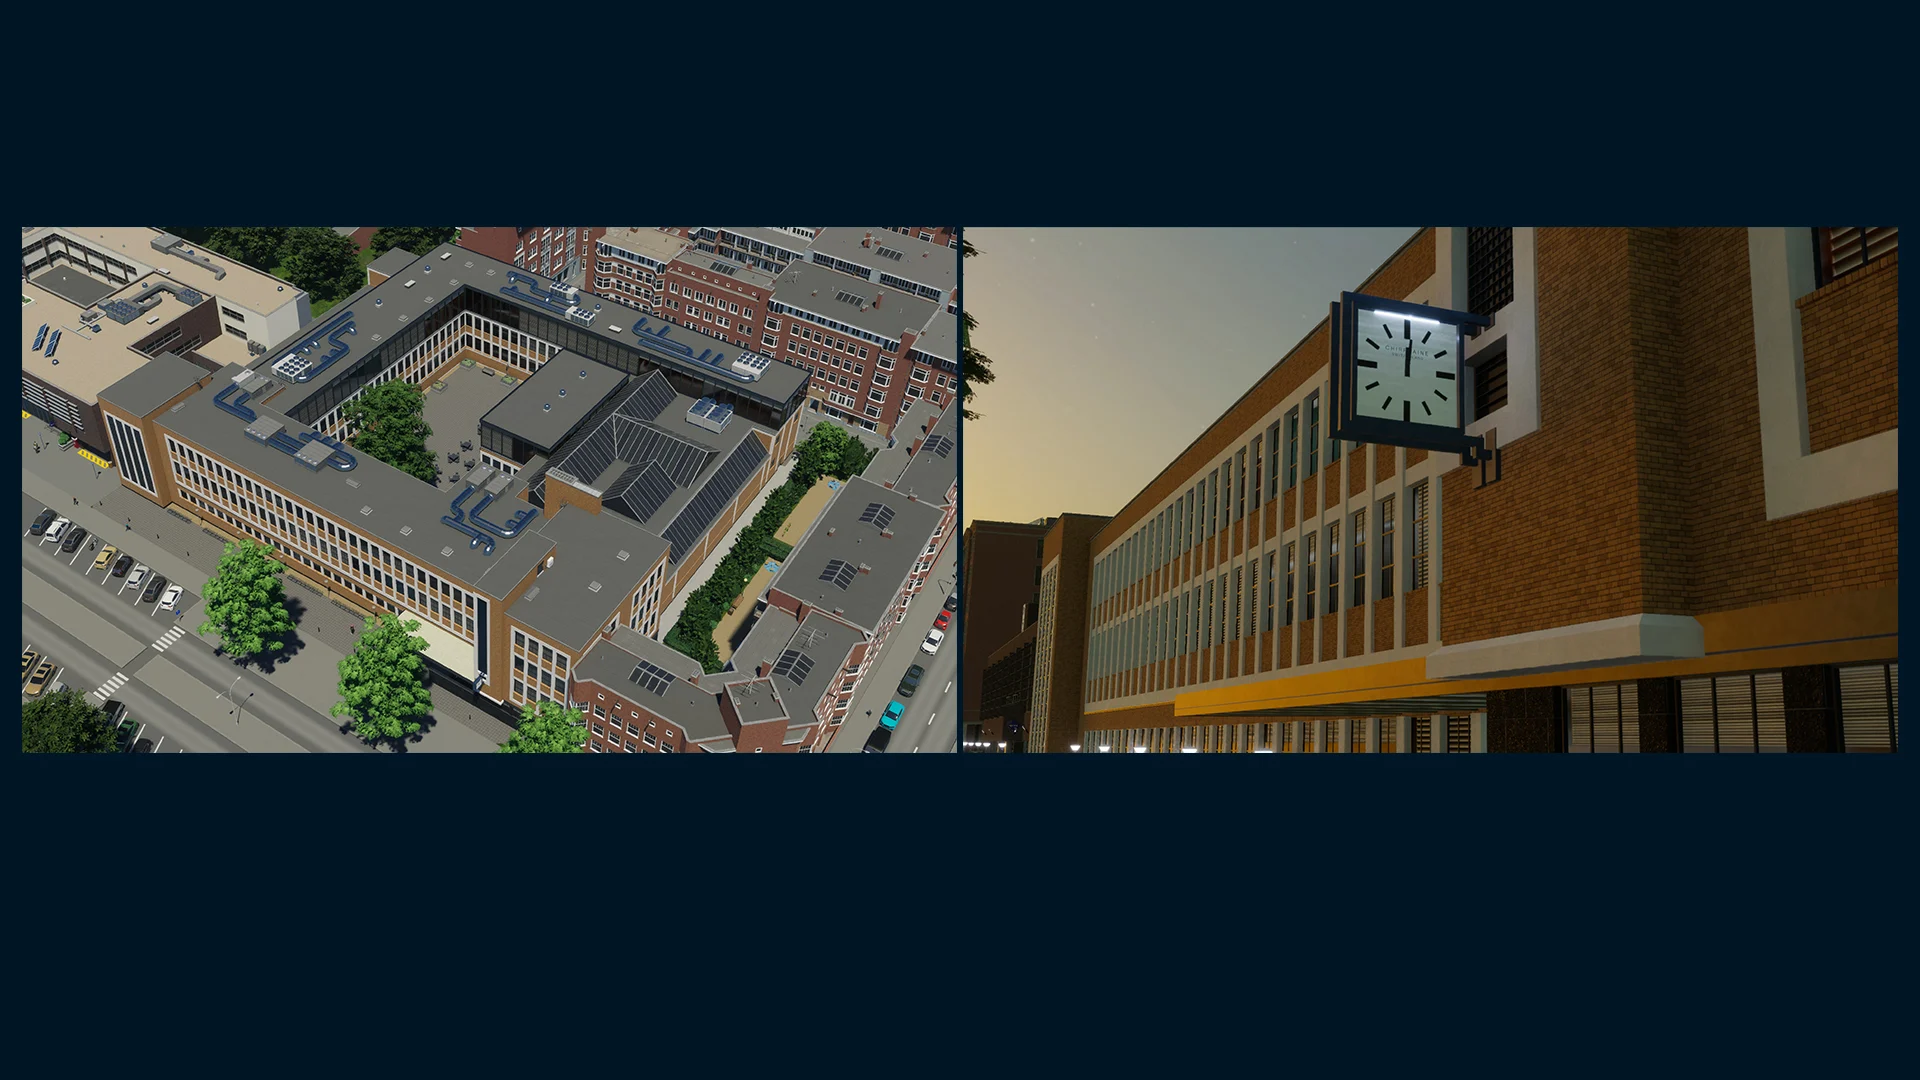
University
As we were browsing for inspiration, we stumbled upon a building located in The Hague. It immediately became my personal pick for the university as I really liked its style and the contrast between original modernist design and the modern addition on the rooftop. The university features a modest student capacity, making it one of the most efficient university buildings thanks to its small footprint. It features a nicely decorated inner courtyard, which can later house a library, boosting the education quality. The idle rooftop space can later be upgraded to feature extra auditoriums, increasing student capacity. With its brick facade, glass facade, and functional clock, the university is going to be one of the staple assets of any city center.
Crematorium
We settled on the crematorium building early on, as we were set out to provide at least one deathcare building in the pack, knowing the high use of crematoriums from the French Region Pack. With its elegant yet simple design, the real building from The Hague caught our attention, and it was immediately added to the pack. Gèze handled its development and also added a building upgrade that allowed it to increase the hearse capacity, making it a good all-rounder crematorium. The garage upgrade can be used multiple times as an entirely free-standing building or attached to the edge of the lot.
Water Tower
During the development of the pack, we decided to include a water tower. We had a couple of candidates to decide on from, with designs varying from Art Deco to post-modernist designs. Among the list, Feindbold picked one that is located in Zoetermeer as an inspiration.
The water tower provides water storage for your city, while also working as a minor tourist attraction. It can be placed away from road infrastructure as a standing structure or used as a centerpiece of your local park, just like the real one.
Substation
The early 20th century marked the large-scale civil engineering projects across the Netherlands. One of them was Zuiderzeewerken, the large-scale land reclamation and damming of Zuiderzee. Another one was the urban re-planning of Amsterdam starting from the 1910s. The substation of the Netherlands Region Pack is inspired by a now-national landmark building from the early 1920s to serve as a substation in South Amsterdam. Its Business Expressionist/Amsterdam School design and small footprint make it the perfect utility asset under the electricity tab. You can connect high-voltage cables via overground or underground with ease.
It also features a fiber-optics box upgrade, boosting the internet speed of its local neighborhood.

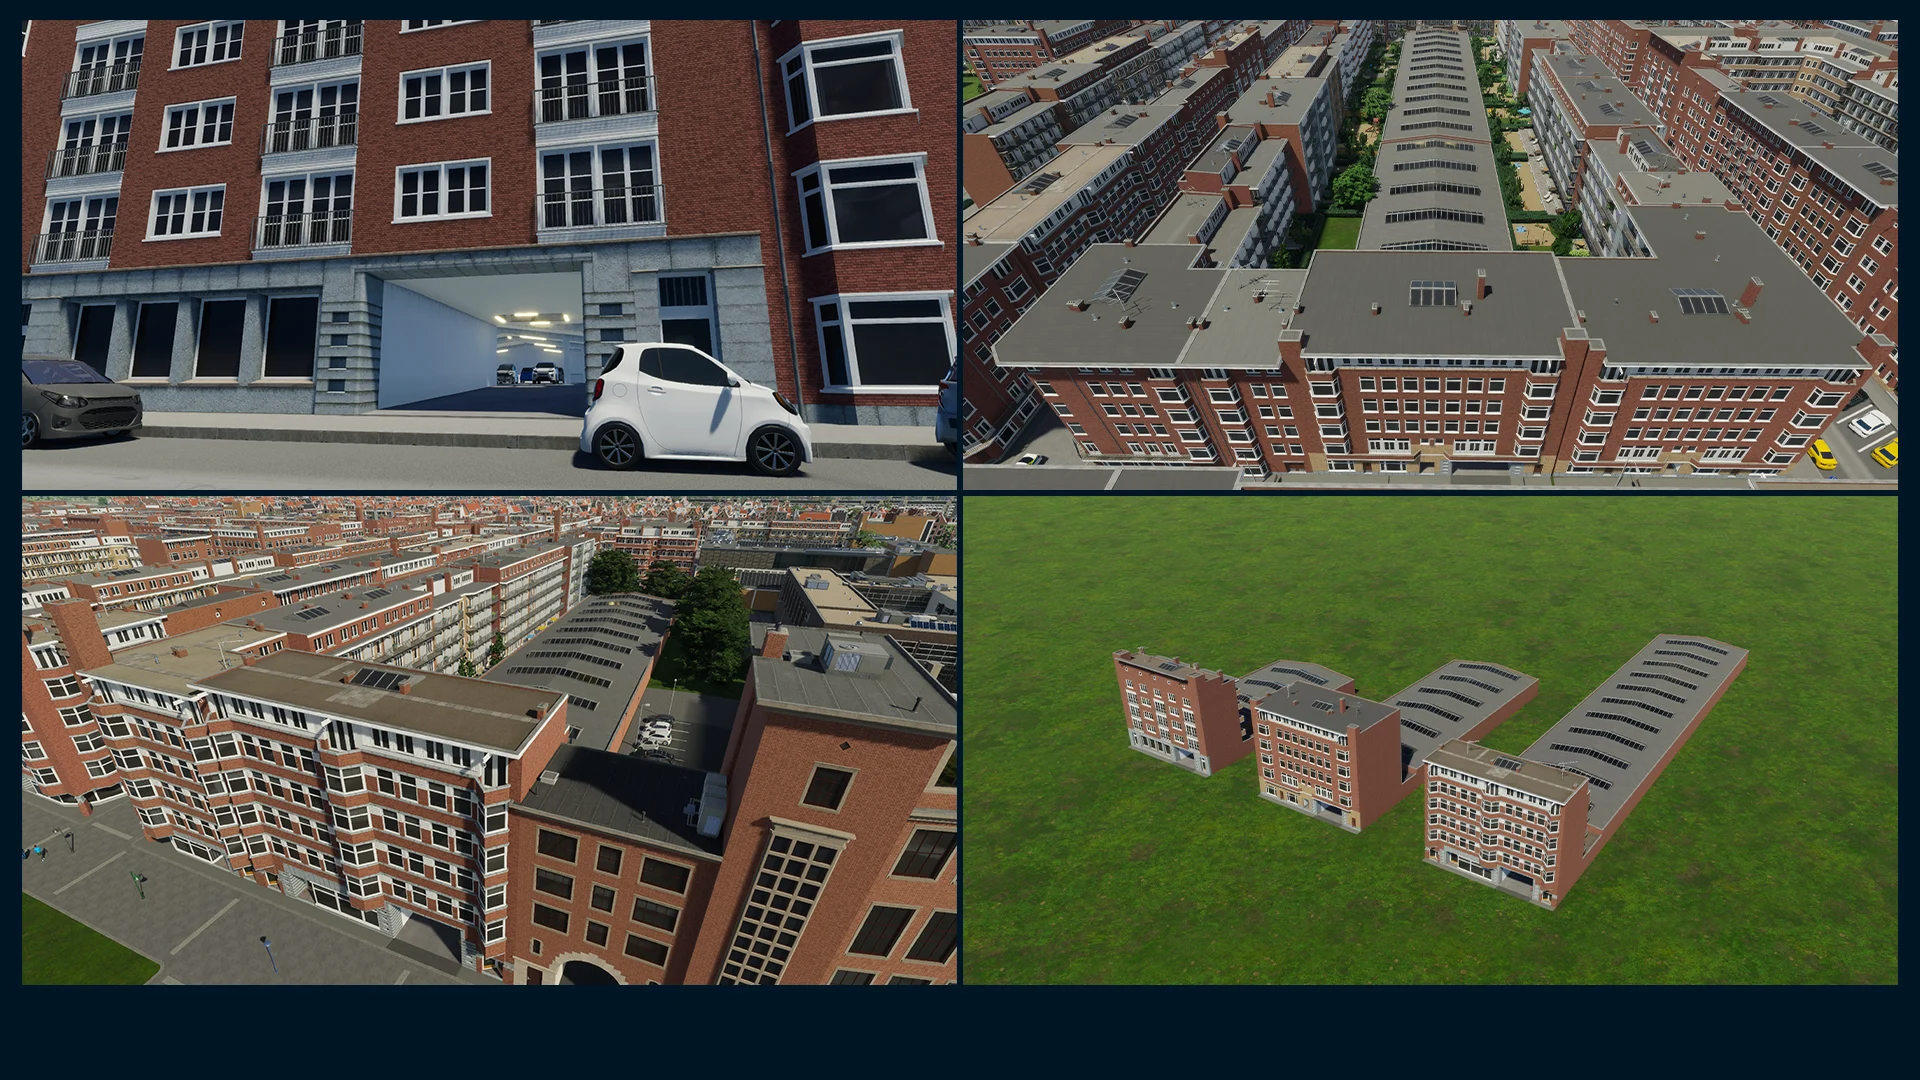
Parking Garages and Small Post Office
As we gathered references from Amsterdam, Feindbold noticed that some building blocks also feature garages under the buildings. As a potential pack feature, we thought it would be interesting to provide urban parking solutions aside from the parking garages that the game offers, which are really not compatible with the art of the pack.
Feindbold decided to make three versions of the garages varying in capacity and building depth, while also having an identical residential facade design from medium-density housing.
The post office shares the same idea with the garages and offers postal services instead. The garage is allocated for post vans and delivery trucks to drop off mail.
Historic Post Office
The Historic Post Office is a unique service building of the pack. It is based on the real-life counterpart located in Utrecht. As a fan of Art Deco, I felt the urge to include it in the Netherlands Region Pack. As a service building, it can later be upgraded to feature a city museum that provides a tourist attraction, while still retaining its original functionality. Feindbold also assisted with the lion statues, which definitely helped the characteristics of the building.

Train Station
Since I was involved with this pack, it was a necessity to include a train station. My original plan was to model something similar to Amsterdam Main Station, but its rather unique facade made it an impossible task to accomplish in the given time. I then decided to look at The Hague and did a mockup model to check building dimensions. After that, Eindhoven entered the mix, and the Mid-Century Modern design made it a clear winner.
The station features a rear entrance that can be used by citizens in case a road is connected. As a must, the station has a clock tower showing in-game time.

Historical Windmill
We’ve been looking for an asset that manifests the Netherlands at first sight. The answer was, of course, a windmill. Since we were aware that players do not like one-time ploppable buildings, the windmill had to be placeable multiple times, must not look too unique or stand out too much from other assets. Gruny decided on a windmill from Delft as an inspiration, creating the ultimate Dutch asset of the pack. The windmill is not static, but features animated wind sails that come in two different colours. It also features a gift shop as an upgrade that boosts its tourist attraction/park stats.

Cemetery
The last asset that deserves a description is the modular cemetery. I wanted to include a cemetery in the pack in order to have an asset that players can customize to the max, deal with the deathcare properly as their cities grow larger with an aging population. As a result, the cemetery became the most complex asset of the pack, offering more than a dozen functional and beautification upgrades, having its own small gameplay loop. A proper shoutout is deserved here - Peanut - as he provided his technical knowledge when it was needed in order to get this complex asset working the way I intended to.

How it works
Cemetery is a standalone building that functions right out of the box. If you want to customize your deathcare towards crematorium or burial sites, you can have this choice via upgrades. Around 60% of the Netherlands prefers cremation, due to the challenges and costs of finding a burial site. Even then, these sites are ‘rented’, offering burial services for 10 to 30 years with yearly costs, making cremation a more affordable and respectable alternative.
Cemetery upgrades contain paths, which allows them to snap to the slots of the cemetery building. You can pick either slot and start linking multiple upgrades together to expand your cemetery facility. Some upgrades rely on three-slot or two-slot alignment, like crematoriums, auditoriums, or hearse upgrades. Use snapping options to your advantage - options such as existing geometry or roadside snapping can help you chaining modules together easily. You can plan ahead and develop as you go, or manually drag paths between modules, and further customize your cemetery. If you have any empty space, there is also a free placement burial site, further increasing the capacity.
Aside from buildings, I also included wall props and urns and made them available in-game for those wishing to create custom cemeteries or use them in a different setting, such as parks.

Props
For the Region Pack, we also worked on custom props which add the finishing touches. Gèze created a set of wall lights that are used to prop the historical row housing. Aside from the aforementioned cemetery props, I also added custom bollards modeled after the ones in Amsterdam and have used them extensively on the service buildings I have made. Just like wall props, bollards are available in-game to use for decoration purposes.
Final Notes
Despite its long Developer Diary, the Netherlands Region Pack was made in a short time, and based on our experience with other Region Packs we worked on, the process was rather smooth. As a personal note, this pack was special for all of us, since the Netherlands has always been the top suggestion for a Region Pack. I am glad that we were given the opportunity to work on it, and hopefully, you will enjoy the results of our work on the Netherlands Region Pack!
Thank you for reading all the way down here. If you have questions, don’t hesitate to comment on this thread. You can also find us in our Cities: Skylines Modding Discord and on PDXMods or socials:
Discord Link | Feindbold | Gèze | Gruny | R3V0


